Monday, 31 December 2012
Have you ever deleted a file that you did not wish to and wanted to
recover it but did not find it in the recycle bin? You probably deleted
it permanently with Shift+Delete or emptied the Recycle Bin. Now what?
Don't worry, you may still have a chance to get it back. This article
lists some free software that can recover deleted files from your hard
drive or any other storage device instantly.
But how do the software mentioned below undelete deleted files?

There are many free software that allow users to do this. Some of them are given below:-
1) Pandora Recovery

2) TOKIWA DataRecovery

3) Recuva

All of these recovery software support recovery from memory sticks, digital camera cards and MP3 players. They support undeleting all types of pictures, software, movies and documents from both FAT and NTFS formatted drives . They work on Windows 8, Windows 7, Windows Vista and Windows XP.

1) When a file is deleted accidentally on a storage device, make sure that you don't do anything on it as doing that would increase the chances of new data being written over your deleted files; which would make file recovery impossible.
2) If you have deleted files on your main computer (the one you are using right now), do not browse the internet, download new software or shut it down. Keep it running and go to another computer, download one of the software mentioned above that is portable and save it on a flash drive. Then plugin the flash drive in your current system and perform file recovery. Regardless of whether you accidentally delete files a lot or not, make sure to always have that software in your flash drive in case you accidentally delete important files.
3) If one software fails to recover your deleted file, it does not mean that another one wouldn't recover it too.
"Dont forget to subscribe,join my site for new Games and softwares Updates,and to leave comments!"
Monday, 31 December 2012 2
You have a flash drive or probably an external hard drive that currently
has FAT32 file system and you want to change it to NTFS, because FAT32
does not support handling large files (over 4GB) or it is just simply
old for your taste but there is just one problem, you don't want to lose
your saved data. This article is for you then as it explains exactly
how you can achieve seamless transition from FAT to NTFS without
involving any data loss.

While it is generally recommended to use the NTFS file system because of its stability, security and lesser defragmentation time, most of us end up using FAT32 because that is what most disks are preformatted with. Unless, we notice the “Not enough disk space error” despite disk space being available, we don't bother to change the file system. Moreover, most of us don't change it because of the risk of losing important data and lack of time (read laziness). As Microsoft was aware of this scenario, they added a capability in the command prompt to overcome this by executing a simple command. There are many software that support this too but the Convert command is one of the easiest ways to do so. Follow the steps below to know how:-
Important: While this method works perfectly, I would still advise you to backup your data in case anything goes wrong.
2) Click on Start.
3) Type cmd in the search bar if you use Windows 7, Windows 8 or Windows Vista. If you use Windows XP, click on Run and then execute cmd.
4) Execute "chkdsk h: /f " (without quotes) where H is the letter of the drive to undergo conversion. This checks the drive for errors and fixes them automatically.
5) Execute "Convert H: /FS:NTFS" (without quotes). H is again the letter of the drive to be converted.
6) The command prompt will start the conversion process and after a few minutes, CMD will say that conversion was successful.
7) You can check it in the properties of the drive through right click<Properties.

This works on Windows 7, Windows XP, Windows 8 and Windows Vista. I converted my flash drive's file system using these steps and it worked flawlessly. It is interesting to note that this method cannot be used to reconvert NTFS file system back to FAT32. To reconvert back to FAT32, you will need to format the entire drive which will definitely cause data loss.
While it is generally recommended to use the NTFS file system because of its stability, security and lesser defragmentation time, most of us end up using FAT32 because that is what most disks are preformatted with. Unless, we notice the “Not enough disk space error” despite disk space being available, we don't bother to change the file system. Moreover, most of us don't change it because of the risk of losing important data and lack of time (read laziness). As Microsoft was aware of this scenario, they added a capability in the command prompt to overcome this by executing a simple command. There are many software that support this too but the Convert command is one of the easiest ways to do so. Follow the steps below to know how:-
Important: While this method works perfectly, I would still advise you to backup your data in case anything goes wrong.
FAT 32 to NTFS Conversion Steps
1) Go to Computer, and note the name of the drive whose file system you wish to convert.2) Click on Start.
3) Type cmd in the search bar if you use Windows 7, Windows 8 or Windows Vista. If you use Windows XP, click on Run and then execute cmd.
4) Execute "chkdsk h: /f " (without quotes) where H is the letter of the drive to undergo conversion. This checks the drive for errors and fixes them automatically.
5) Execute "Convert H: /FS:NTFS" (without quotes). H is again the letter of the drive to be converted.
6) The command prompt will start the conversion process and after a few minutes, CMD will say that conversion was successful.
7) You can check it in the properties of the drive through right click<Properties.
This works on Windows 7, Windows XP, Windows 8 and Windows Vista. I converted my flash drive's file system using these steps and it worked flawlessly. It is interesting to note that this method cannot be used to reconvert NTFS file system back to FAT32. To reconvert back to FAT32, you will need to format the entire drive which will definitely cause data loss.
"Dont forget to subscribe,join my site for new Games and softwares Updates,and to leave comments!"
Computers have simplified our life to a great extent. Things that were
impossible earlier can now be completed instantly thanks to computers.
But, does this mean that a PC is all work and no play?
Obviously not! Here are some of the best tricks you can try out on your Windows based computer.
 1) Make your computer speak what you type
You can use your PC's built in features and some VBScript magic to create a simple program that will make your computer speak whatever you input to it. What are you waiting for? Head over to this post to start a conversation.
2) Find your computer's gender
Want to know if your PC is male or female? Simple. Try the previous trick to know if your computer is a 'he' or a 'she'.
On a serious note, this depends upon the voice you have selected in Microsoft Text to Speech options.
3) Lock Folders with password
Do you often have other people seeing your personal files? You can store them in a password protected folder so that only you can access them. Go see this post to know how.
4) Make your computer greet you every time you start Windows
A simple modification in the first trick will let you have an awesome computer said welcome that you can use to impress all your friends. Just read this post to make your computer welcome you in its own mechanical voice.
5) Have fun with the Notepad
 If you think that Notepad is just a basic text editor, then my friend,
you are horribly wrong. You can use Notepad to create everything from a
personalized log to harmless viruses that are incredibly annoying. Go see this post to know how.
If you think that Notepad is just a basic text editor, then my friend,
you are horribly wrong. You can use Notepad to create everything from a
personalized log to harmless viruses that are incredibly annoying. Go see this post to know how.
6) Command Prompt too has some tricks up its sleeves
So, you thought that Notepad has some tricks but not the Command prompt? If you thought so, then you would be surprised to see the amount of fun you can have from the Windows Command Prompt. Just see this post to get impressed.
7) Change your Processor's name
Are you bored of your old processor and want a new one with a staggering name? Change its name to something extraordinary to get that something special for your PC.
8) Make a Keyboard Disco
Use some VBScript coding to create a live disco using the LED keys on your keyboard. See this post to know how.
9) Use your Keyboard as Mouse.
You know you can use your mouse as keyboard using the On-screen keyboard. What if I tell you that it is also possible to do the reverse? Just read post to see how.
Obviously not! Here are some of the best tricks you can try out on your Windows based computer.
You can use your PC's built in features and some VBScript magic to create a simple program that will make your computer speak whatever you input to it. What are you waiting for? Head over to this post to start a conversation.
2) Find your computer's gender
Want to know if your PC is male or female? Simple. Try the previous trick to know if your computer is a 'he' or a 'she'.
On a serious note, this depends upon the voice you have selected in Microsoft Text to Speech options.
3) Lock Folders with password
Do you often have other people seeing your personal files? You can store them in a password protected folder so that only you can access them. Go see this post to know how.
4) Make your computer greet you every time you start Windows
A simple modification in the first trick will let you have an awesome computer said welcome that you can use to impress all your friends. Just read this post to make your computer welcome you in its own mechanical voice.
5) Have fun with the Notepad
6) Command Prompt too has some tricks up its sleeves
So, you thought that Notepad has some tricks but not the Command prompt? If you thought so, then you would be surprised to see the amount of fun you can have from the Windows Command Prompt. Just see this post to get impressed.
7) Change your Processor's name
Are you bored of your old processor and want a new one with a staggering name? Change its name to something extraordinary to get that something special for your PC.
8) Make a Keyboard Disco
Use some VBScript coding to create a live disco using the LED keys on your keyboard. See this post to know how.
9) Use your Keyboard as Mouse.
You know you can use your mouse as keyboard using the On-screen keyboard. What if I tell you that it is also possible to do the reverse? Just read post to see how.
"Dont forget to subscribe,join my site for new Games and softwares Updates,and to leave comments!"
All of us have some files and folders that we consider private. They can
be anything from our business documents to pictures of friends and
family. These are files that we don't want other people using our
computer to know about. As Windows offers no way to protect our private
information, most of us get in awkward situations when these files are
discovered by unwanted people.
 Surely,
you can store this information in a hidden folder. The only problem is
that anyone can easily search the contents of a hidden folder using
Windows Search itself.
Surely,
you can store this information in a hidden folder. The only problem is
that anyone can easily search the contents of a hidden folder using
Windows Search itself.
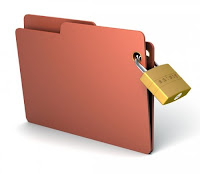
The only viable solution is storing this content in a password protected folder so that only those people knowing the password of the folder can access it. There are many Folder Locking programs available online but the problem is that most of the good ones are paid. Even if you do manage to get a good free one, you will be looked at suspiciously when people see a folder locker in the list of your installed programs.
If you too find yourself in a similar situation, you can try Folder Lock, a password protector for Windows folders that is not only free but is also portable meaning that it does not need to be installed. Just click on the exe file and the program will start running. I have created this program based on suggestions and feature requests that I have received by email over the last two years.
Download for Windows XP
How to use FolderLock?
When you run Folder Lock for the first time, the program will ask you for a password that you want to use. Enter a password that you can remember as this will be the password to your protected folder.
After entering the password, the program will open a folder named SecuredFILES. This is your protected folder. You can add all your private files in this folder. After adding all your files, you may close this folder.
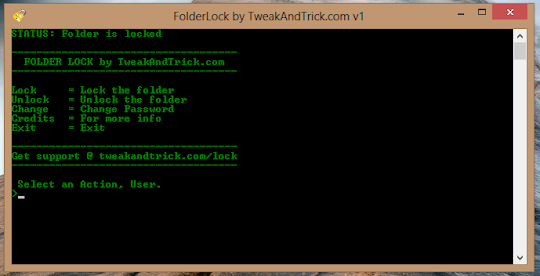
Then, you can use the menu in the program to lock your folder. After successfully locking the folder, FolderLock will display that the folder is locked.
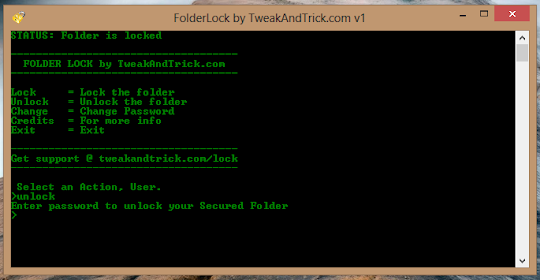
Unlocking the protected folder is easy. Just type unlock as your action. Then the program will ask you to enter your password. Upon successfully entering the password, the program will display the contents of your protected folder.
Changing the Password: Just type change as your action. The program will ask you for your current password. Upon successful entry of the current password, the program will ask for your new password and change it instantly.
Acknowledgment: This software has been made possible only through the suggestions of readers of this blog, especially Ernell Albert Galido for his idea of using a menu based interface.
Windows Compatibility: This program has been successfully tested on Windows 8, Windows 7, Windows Vista and Windows XP.
The only viable solution is storing this content in a password protected folder so that only those people knowing the password of the folder can access it. There are many Folder Locking programs available online but the problem is that most of the good ones are paid. Even if you do manage to get a good free one, you will be looked at suspiciously when people see a folder locker in the list of your installed programs.
If you too find yourself in a similar situation, you can try Folder Lock, a password protector for Windows folders that is not only free but is also portable meaning that it does not need to be installed. Just click on the exe file and the program will start running. I have created this program based on suggestions and feature requests that I have received by email over the last two years.
Folder Lock
Folder Lock offers each user a protected folder that can only be opened by entering the password in FolderLock. Unlike most security programs, FolderLock is small in size (nearly 146KB) and does not show the folder that it is protecting. This gives an additional advantage that people who don't know the password do not have a target to try and hack their way into. As the software is portable, you can hide it or even delete it after protecting your folder and no one will have a clue that it was used. Then whenever you need to access protected files, you can re-download the program from this page, enter the password and access your protected files.Download
Download for Windows 8, Windows 7 and Windows VistaDownload for Windows XP
How to use FolderLock?
When you run Folder Lock for the first time, the program will ask you for a password that you want to use. Enter a password that you can remember as this will be the password to your protected folder.
After entering the password, the program will open a folder named SecuredFILES. This is your protected folder. You can add all your private files in this folder. After adding all your files, you may close this folder.
Then, you can use the menu in the program to lock your folder. After successfully locking the folder, FolderLock will display that the folder is locked.
Unlocking the protected folder is easy. Just type unlock as your action. Then the program will ask you to enter your password. Upon successfully entering the password, the program will display the contents of your protected folder.
Changing the Password: Just type change as your action. The program will ask you for your current password. Upon successful entry of the current password, the program will ask for your new password and change it instantly.
Acknowledgment: This software has been made possible only through the suggestions of readers of this blog, especially Ernell Albert Galido for his idea of using a menu based interface.
Windows Compatibility: This program has been successfully tested on Windows 8, Windows 7, Windows Vista and Windows XP.
"Dont forget to subscribe,join my site for new Games and softwares Updates,and to leave comments!"
If your mouse is not working and you don't wish to wait till you get a
new mouse, you would definitely like to know how you can use your
keyboard as your mouse. It is easy to use your mouse as keyboard in Windows using the On Screen Keyboard utility, but it is also possible to do the reverse.

All you need to do is:
Windows XP Users:-

Windows 8, Windows 7 and Vista Users:
You can also increase the acceleration and speed of your mouse movements according to your needs.
You can alternately press the Alt+Shift+Num Lock combination to instantly activate the mouse keys.

For laptops, this will only work if your laptop keyboard has a numeric keypad or alternative keys with which you can use with the Number Lock Key or the Function key.
On my laptop, number 6 key of the numeric keypad moves the mouse pointer left, number 4 key moves the mouse pointer right, number 2 key moves it down, number 8 key moves the mouse pointer up, number 5 and + key serve as right click while the number 0 key works as left click.
All you need to do is:
Windows XP Users:-
- Go to Control Panel.
- Then click on Switch to Classic View.
- Then Click on Accessibility Options.
- Then Click on the Mouse Tab.
- Select Use MouseKeys.
- Click on OK.
- Then activate NumberLock (by pressing the NumLk key).
- You should hear a beep sound.
- Now you can control the mouse pointer using the arrow keys on the numeric keypad.
Windows 8, Windows 7 and Vista Users:
- Open Ease of Access Center by clicking the Start button ,
clicking Control Panel, clicking Ease of Access, and then clicking Ease
of Access Center.
- Click Make the mouse easier to use.
- Under Control the mouse with the keyboard, select the Turn on Mouse Keys check box.
You can also increase the acceleration and speed of your mouse movements according to your needs.
You can alternately press the Alt+Shift+Num Lock combination to instantly activate the mouse keys.
For laptops, this will only work if your laptop keyboard has a numeric keypad or alternative keys with which you can use with the Number Lock Key or the Function key.
On my laptop, number 6 key of the numeric keypad moves the mouse pointer left, number 4 key moves the mouse pointer right, number 2 key moves it down, number 8 key moves the mouse pointer up, number 5 and + key serve as right click while the number 0 key works as left click.
"Dont forget to subscribe,join my site for new Games and softwares Updates,and to leave comments!"
Keyboards usually have small LED's which indicate whether different
types of locks are activated or not. Here is a trick to use the lights
of your keyboard in a more creative manner in Windows.
This trick uses a simple Visual basic script which when activated makes your scroll lock, caps lock and num locks LED's flash in a cool rhythmic way which gives the perception of a live disco on your keyboard.

To make your own live disco, follow the steps given below:-
1. Open Notepad.
2. Copy paste the exact code given below:-
Double click on the Saved file to see the LED lights on your keyboard go crazy and make your own cool disco.
This trick has been tested on Windows XP, Windows Vista, Windows 7 and Windows 8 and found to be working perfectly.
You can disable the keyboard disco by starting Task Manager and ending the wscript.exe process.
This trick uses a simple Visual basic script which when activated makes your scroll lock, caps lock and num locks LED's flash in a cool rhythmic way which gives the perception of a live disco on your keyboard.
To make your own live disco, follow the steps given below:-
1. Open Notepad.
2. Copy paste the exact code given below:-
Set wshShell =wscript.CreateObject("WScript.Shell")3. Save the file as Disco.vbs or "*.vbs".
do
wscript.sleep 100
wshshell.sendkeys "{CAPSLOCK}"
wshshell.sendkeys "{NUMLOCK}"
wshshell.sendkeys "{SCROLLLOCK}"
loop
Double click on the Saved file to see the LED lights on your keyboard go crazy and make your own cool disco.
This trick has been tested on Windows XP, Windows Vista, Windows 7 and Windows 8 and found to be working perfectly.
You can disable the keyboard disco by starting Task Manager and ending the wscript.exe process.
"Dont forget to subscribe,join my site for new Games and softwares Updates,and to leave comments!"
Have you ever wondered how can you make your computer speak whatever you
input to it like in the movies? Would it not be fun? If only it was
possible! Rejoice, because now it is possible. Well, if you wish to know
how to do this, then you have come to the right place. With this trick,
you can create a script in Windows which will make your computer speak
whatever you input to it.

Steps
Now your Computer will speak / talk what you typed in Step 4. Try it yourself.
Windows Compatibility: This VBS file can be executed on all versions of Windows including Windows XP, Windows Vista, Windows 7 and Windows 8.
Personal Experience: I personally showed this trick to many of my friends and they were literally left awestruck. You too can impress your friends by making your PC talk and be the Computer Wiz.
Related : Make your Computer Welcome You!
Steps
- Open Notepad.
- Copy and paste the exact code given below.
Dim Message, Speak
Message=InputBox("Enter text","Speak")
Set Speak=CreateObject("sapi.spvoice")
Speak.Speak Message
3. Click on File Menu, Save As, select All Types in Save as Type option, and save the file as Speak.vbs or "*.vbs".
4. Double click on the saved file, a window will open like the one in
the image. Enter some text in enter text column and click OK.
Now your Computer will speak / talk what you typed in Step 4. Try it yourself.
Windows Compatibility: This VBS file can be executed on all versions of Windows including Windows XP, Windows Vista, Windows 7 and Windows 8.
Personal Experience: I personally showed this trick to many of my friends and they were literally left awestruck. You too can impress your friends by making your PC talk and be the Computer Wiz.
"Dont forget to subscribe,join my site for new Games and softwares Updates,and to leave comments!"
An iPhone is a brilliant device and anyone who has one knows that it can
make almost everything you do easier; whether that be looking for a
nearby bar or sending e-mails to clients and colleagues. However, while
you're probably familiar with many of the very useful aspects of your
phone, there is a good chance that there are still things that you
haven't made full use of yet. There are probably elements of your phone
that you aren't using to the fullest. Here we will look at a few things
to do with your iPhone that you perhaps weren't aware that you could do.
Use a Keyboard

iPhones are undoubtedly useful productivity tools, but unfortunately, they are limited by having a small touch screen as the only input option. A great way to get more out of your iPhone, is to use a Bluetooth keyboard to control it. Using a Bluetooth keyboard, you can type as quickly as you could on a PC and even control your phone remotely.
Share Files

iPhones come with a built in cloud service called iCloud. iCloud allows you to drag and drop files into a shared folder which all of your devices can access. This way, you can edit a file and then share it with your main computer within instances and with no need to use any wires. Drop Box offers a similar option.
Tethering

Only recently have iPhones caught up to Android in this respect, and it's a good thing they did as this is one of THE most useful functions of modern smartphones. Basically by enabling wireless tethering, you can provide a Wi-Fi internet connection that a computer or even another phone can connect to; meaning that you always have access to the web wherever you go.
Jailbreaking

If you haven't considered jailbreaking your iPhone yet, then perhaps it's time to. This way you will be able to run a vast number of apps that you currently won't be able to and that will allow you to get a LOT more out of your phone. This includes the use of emulators, the ability to customize the appearance and even the option to use a different keyboard or a different web browser. It's not illegal and it's easily reversible. The only thing against it is that it voids your warranty. So, use it only if your phone is out of its warranty period.
HDMI Cable

There are HDMI cables available for iPhone that allow you to connect your smartphone to a HD TV; meaning that you can watch YouTube or play apps on the big screen. Combine this with a wireless keyboard or controller and you practically have a mini game console that you can carry anywhere with you.
Computer Control

Apps like TeamViewer allow you to control your computer wherever you go; meaning that you can open and edit documents, stream movies and more. This is amazing for watching films while reclining on the sofa, or for quickly accessing your files when you're traveling.
Use a Keyboard
iPhones are undoubtedly useful productivity tools, but unfortunately, they are limited by having a small touch screen as the only input option. A great way to get more out of your iPhone, is to use a Bluetooth keyboard to control it. Using a Bluetooth keyboard, you can type as quickly as you could on a PC and even control your phone remotely.
Share Files
iPhones come with a built in cloud service called iCloud. iCloud allows you to drag and drop files into a shared folder which all of your devices can access. This way, you can edit a file and then share it with your main computer within instances and with no need to use any wires. Drop Box offers a similar option.
Tethering
Only recently have iPhones caught up to Android in this respect, and it's a good thing they did as this is one of THE most useful functions of modern smartphones. Basically by enabling wireless tethering, you can provide a Wi-Fi internet connection that a computer or even another phone can connect to; meaning that you always have access to the web wherever you go.
Jailbreaking
If you haven't considered jailbreaking your iPhone yet, then perhaps it's time to. This way you will be able to run a vast number of apps that you currently won't be able to and that will allow you to get a LOT more out of your phone. This includes the use of emulators, the ability to customize the appearance and even the option to use a different keyboard or a different web browser. It's not illegal and it's easily reversible. The only thing against it is that it voids your warranty. So, use it only if your phone is out of its warranty period.
HDMI Cable
There are HDMI cables available for iPhone that allow you to connect your smartphone to a HD TV; meaning that you can watch YouTube or play apps on the big screen. Combine this with a wireless keyboard or controller and you practically have a mini game console that you can carry anywhere with you.
Computer Control
Apps like TeamViewer allow you to control your computer wherever you go; meaning that you can open and edit documents, stream movies and more. This is amazing for watching films while reclining on the sofa, or for quickly accessing your files when you're traveling.
"Dont forget to subscribe,join my site for new Games and softwares Updates,and to leave comments!"
Suppose you wish to watch a movie or share a slide-show of pictures with
your family on your PC but have a screen that leaves much to be
desired. In such a situation, you can connect your computer to a
television screen to allow your entire family to enjoy comfortably.
 There
are many ways in which you can connect your laptop/ computer to a
television. However, the overall video quality will be different for
different methods. You can choose which one to use based on the quality
or the availability of hardware. The first step is to know what
type of ports and connections your TV and computer have. If you already
know the type of ports and connections available on your hardware, you can directly jump to Step 2. If not, then the different types of ports are explained in detail below:-
There
are many ways in which you can connect your laptop/ computer to a
television. However, the overall video quality will be different for
different methods. You can choose which one to use based on the quality
or the availability of hardware. The first step is to know what
type of ports and connections your TV and computer have. If you already
know the type of ports and connections available on your hardware, you can directly jump to Step 2. If not, then the different types of ports are explained in detail below:-
1) RCA/Composite: The oldest and the lowest
quality connection available. They are the Yellow, Red and White
connections most of us are familiar with. Yellow is used for composite
video, white for left analog audio and red for right analog audio.
2) S-Video: S-Video or Super Video offers slightly better quality than Composite connections. As it is one of the oldest type of connections available, most televisions and computers have it. There are two types of S-Video ports, one containing 4 pins and the other containing 7 pins. This type of connection is used only for video. So you will need to connect an audio cable from your computer's headphone jack to the red and white audio inputs on your TV if you want audio to work.
3) VGA(Video Graphics Array): Most computers and televisions have a VGA port. It offers much better quality than S-Video and should be preferred if you have a HDTV. Older CRT TVs however, will not have a VGA port and will require a PC to Television converter. Just like S-Video, VGA also does not support audio and will require an additional audio cable.
4) DVI: Digital Video Interface offers much
better quality than VGA connections. Most laptop computers and HD TVs
will have these connections. Just as the name suggest, this type of
connection can be used only with digital TVs. Also like the previous
two, DVI connections also require the use of an audio cable for audio to
work.
5) HDMI: The highest quality connections available. Most HD TVs will have this connection, however, chances are that your computer would not. If your computer happens to have a HDMI connection port, this should be preferably used. If your computer doesn't, you can use an HDMI to DVI adapter to convert HDMI to DVI.

Step 2: Once a common type of port between the two devices is recognized, you will need the right connector cable to physically connect them. The different types of connector cables are pictured above. If you do not find two matching types of connection ports, you will need an adapter to make the connections type match.
Step 3: After connecting the two devices, on your TV, select the external input with which your TV is connected to the computer. It may be HDMI1 or AV1 depending on how you have made the connection. This is much similar to how you select input from your DVD player.
If you have followed the steps correctly, your TV should now be displaying your computer's screen.
Important: If your computer is not recognizing the external display, you must connect the TV before starting your computer. If the picture appears distorted, you will need to change the screen resolution of your TV by altering the display settings from your computer. Most older TVs will support only one display resolution while newer TVs will support plenty of them.
 |
| Different types of PC to TV connection ports |
2) S-Video: S-Video or Super Video offers slightly better quality than Composite connections. As it is one of the oldest type of connections available, most televisions and computers have it. There are two types of S-Video ports, one containing 4 pins and the other containing 7 pins. This type of connection is used only for video. So you will need to connect an audio cable from your computer's headphone jack to the red and white audio inputs on your TV if you want audio to work.
3) VGA(Video Graphics Array): Most computers and televisions have a VGA port. It offers much better quality than S-Video and should be preferred if you have a HDTV. Older CRT TVs however, will not have a VGA port and will require a PC to Television converter. Just like S-Video, VGA also does not support audio and will require an additional audio cable.
 |
| Different types of connecting cables to connect computers to TVs |
5) HDMI: The highest quality connections available. Most HD TVs will have this connection, however, chances are that your computer would not. If your computer happens to have a HDMI connection port, this should be preferably used. If your computer doesn't, you can use an HDMI to DVI adapter to convert HDMI to DVI.
Step 2: Once a common type of port between the two devices is recognized, you will need the right connector cable to physically connect them. The different types of connector cables are pictured above. If you do not find two matching types of connection ports, you will need an adapter to make the connections type match.
Step 3: After connecting the two devices, on your TV, select the external input with which your TV is connected to the computer. It may be HDMI1 or AV1 depending on how you have made the connection. This is much similar to how you select input from your DVD player.
If you have followed the steps correctly, your TV should now be displaying your computer's screen.
Important: If your computer is not recognizing the external display, you must connect the TV before starting your computer. If the picture appears distorted, you will need to change the screen resolution of your TV by altering the display settings from your computer. Most older TVs will support only one display resolution while newer TVs will support plenty of them.
"Dont forget to subscribe,join my site for new Games and softwares Updates,and to leave comments!"
Most of us use Facebook to interact with some of our long separated
friends but that does not mean we cannot have fun on Facebook. Here is a
collection of tricks, tips and Easter eggs you can use to enjoy your
experience on Facebook.
Similarly, you can also turn Facebook upside down by selecting English(Upside Down) from the Languages dropdown. This will flip the entire Facebook interface but your status updates would still be "normal".


e.g. Mirror Effect:- !rorrim a ni deppart ma I !oN hO
e.g. Upside Down Effect:- ɯɐp ʞǝʎqoɐɹp¡
e.g Both Mirror and Upside Down Effect:- ¡poפ ǝɯ dlǝH ˙ʎzɐɹɔ ƃuıʇʇǝƃ sı uıɐɹq ʎW
e.g. Text in Bubbles:- Ⓞⓗ Ⓝⓞ! Ⓜⓞⓡⓔ ⓑⓤⓑⓑⓛⓔⓢ
Facebook Easter Eggs: Pirate Language ,Turn Facebook Upside Down
Facebook is not as famous for its Easter eggs as Microsoft, but that does not mean that Facebook's Easter eggs are not entertaining. The one which I especially find interesting is the Pirate Language trick. To enable Pirate Language in Facebook, login to Facebook, click on the down arrow at the right of the top navigation bar, click on Account Settings, click on Edit at the right of the Language option, and in the Primary Language dropdown menu, select English(Pirate) located somewhere near the bottom and be the captain of your Pirate Ship. |
| Blabber t' yer mates |
Similarly, you can also turn Facebook upside down by selecting English(Upside Down) from the Languages dropdown. This will flip the entire Facebook interface but your status updates would still be "normal".
 |
| See. Mark Zuckerberg does know how to headstand. |
Chat on Facebook in your Firefox sidebar while browsing other Websites
To do this, you need to bookmark http://facebook.com/login.php. Then click on Show all Bookmarks (Manage Bookmarks in older versions) in the Bookmarks menu, then locate the newly created bookmark, single click on it, then click on more in the footer, then check Load this bookmark in Sidebar. Now, you can open that bookmark in Firefox's sidebar and keep on browsing other websites too.Show Facebook Status Updates only to Specific People or Hide them from someone
Facebook gives you the option to show your status updates to everyone or only your friends. You can further optimize Facebook so that your status updates are shown only to people you wish. Go to Privacy Settings by clicking the down arrow at the right of the top navigation bar and clicking Privacy Settings. Then, in the Control Your Default Privacy section, click on Custom. Then, customize who you wish to show your posts under the "Make this Visible to Specific People" option and adding their names. You can also hide your statuses from specific people by adding their name in the Hide from These section. You can also individually change the audience of your posts. Go to the post whose audience you wish to change and choose a different audience by clicking on the globe icon (which denotes that the post is public).Hide your past posts so that only your friends can see them
Now you can also customize your past posts so that only your friends can see your past activity. To do this, open Facebook Privacy Settings and under the "Limit the Audience for Past Posts" option, select "Limit Old Posts."Tag people in Status Updates, Wall Posts, Comments or Text
To tag someone in text in a manner that a link is created to the person's profile, use the @ symbol. eg. If you wish to tag John Jamison in your comment write @ John Jamison without any spelling mistake. If the person is in your friend list, a link in blue will be automatically created to the person's profile and he would be "tagged". |
| Facebook text tagging in action |
Write Upside Down, In Bubbles or Inverted Mirror-like text on Facebook
You
might have seen many people update their Facebook status saying that
"this was the last time they bought a keyboard on eBay" or "they have
finally learnt how to update Facebook statuses while doing a headstand"
written upside down. Here is how you too can flip text like that and add
much more cool effects. Just go to Upside Down Text,
uncheck Backwards effect, enter your text and copy the inverted one
from the inverted text column and paste it in your status update or
chats. You can also write inverted mirror like text by un-checking the
upside down effect. To write in bubbles, click on the Bubble Ball text
in the top Navigation bar.
e.g. Mirror Effect:- !rorrim a ni deppart ma I !oN hO
e.g. Upside Down Effect:- ɯɐp ʞǝʎqoɐɹp¡
e.g Both Mirror and Upside Down Effect:- ¡poפ ǝɯ dlǝH ˙ʎzɐɹɔ ƃuıʇʇǝƃ sı uıɐɹq ʎW
e.g. Text in Bubbles:- Ⓞⓗ Ⓝⓞ! Ⓜⓞⓡⓔ ⓑⓤⓑⓑⓛⓔⓢ
"Dont forget to subscribe,join my site for new Games and softwares Updates,and to leave comments!"
When you open Facebook, the first thing that you notice is the blue
color it uses. Ever wondered why is Facebook so blue in color and not
upgrading its theme.
Ever since they started as 'thefacebook', Facebook has stayed with the blue color. Although major changes have been made in the Facebook theme since then, the major unchanged thing has been the blue color.
An exciting fact: In its earlier days, thefacebook.com required you to have an .edu email id to join.
Everywhere from its login page to Facebook groups, you find only blue.
The reason for this is that Mark Zuckerberg, the young founder of Facebook is red-green color-blind and blue is the richest colour for him which he confirmed in an online interview with Leo Laporte.
Another important commercial factor for using blue color is the fact that most colors tend to distract the viewers. Blue on the other hand acts as a transparent background to the main content as visible to the human brain due to which most popular websites tend to use the blue color. It can easily be called a webmaster's favorite color. Blue color is also sometimes referred to as 'Nirvana' for the brain.
All these factors make blue a prominent color on Facebook.
If you are bored with Facebook's blue theme and want a stylish theme, visit Change Facebook Theme.
"Dont forget to subscribe,join my site for new Games and softwares Updates,and to leave comments!"
Ever since they started as 'thefacebook', Facebook has stayed with the blue color. Although major changes have been made in the Facebook theme since then, the major unchanged thing has been the blue color.
 | |
| Facebook from its early days when it was known as thefacebook |
An exciting fact: In its earlier days, thefacebook.com required you to have an .edu email id to join.
Everywhere from its login page to Facebook groups, you find only blue.
 |
| Facebook Login Page. All Blue! |
The reason for this is that Mark Zuckerberg, the young founder of Facebook is red-green color-blind and blue is the richest colour for him which he confirmed in an online interview with Leo Laporte.
Another important commercial factor for using blue color is the fact that most colors tend to distract the viewers. Blue on the other hand acts as a transparent background to the main content as visible to the human brain due to which most popular websites tend to use the blue color. It can easily be called a webmaster's favorite color. Blue color is also sometimes referred to as 'Nirvana' for the brain.
All these factors make blue a prominent color on Facebook.
If you are bored with Facebook's blue theme and want a stylish theme, visit Change Facebook Theme.
"Dont forget to subscribe,join my site for new Games and softwares Updates,and to leave comments!"
Facebook is a social networking site which enables people to connect
with friends and people around. That's how Facebook is usually
introduced but Facebook is beyond the requirement of being introduced as
almost everyone is on it. But Facebook has one flaw, the default blue
theme is really boring.
Some even consider it an annoyance while visiting Facebook. As Facebook does not allow users to change its theme like MySpace used to, users are left with no other option but to bear the theme Facebook wants them to use.
However, it is relatively easy to change the Facebook theme to a stylish one using a Firefox addon and custom themes which are available free of cost on the internet.
An example of the final outcome would be something like in the image.
Requirement: The basic requirement for this to work is to have Mozilla Firefox 3.5 or higher.
Steps to achieve this: The following steps should be carried out to successfully change Facebook theme.


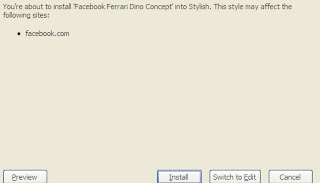
Now whenever you open Facebook, it will show the theme that you have installed with Stylish instead of the boring old blue theme.
Some even consider it an annoyance while visiting Facebook. As Facebook does not allow users to change its theme like MySpace used to, users are left with no other option but to bear the theme Facebook wants them to use.
However, it is relatively easy to change the Facebook theme to a stylish one using a Firefox addon and custom themes which are available free of cost on the internet.
An example of the final outcome would be something like in the image.
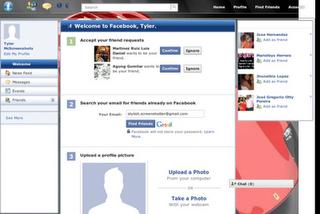 |
| This is the Ferrari theme. More themes are available for you to choose. |
Requirement: The basic requirement for this to work is to have Mozilla Firefox 3.5 or higher.
Steps to achieve this: The following steps should be carried out to successfully change Facebook theme.
- Open Mozilla Firefox and install 'Stylish' addon.
- Follow the basic steps to install the addon.
- Restart Firefox after successfully installing the Stylish addon.
- Login to your Facebook Account and click on the small 'S' button in your Firefox status bar.
- Click on "Find Styles for this Site" to open a new tab with free themes to use for Facebook.
- Click on any theme and a preview will be shown.
- If everything is fine in the previewed theme, click on "Install with Stylish" button at the top right corner of the page.
- A dialog box will open.
- Click on Install in the dialog box.
Now whenever you open Facebook, it will show the theme that you have installed with Stylish instead of the boring old blue theme.
"Dont forget to subscribe,join my site for new Games and softwares Updates,and to leave comments!"
Most people love using Windows 7. That’s because it’s by far the nicest
and the most productive Microsoft operating system to date. But there
can still be glitches, errors, and lags. The good thing about Windows 7
is that it has lots of tools to troubleshoot and repair a slow computer.
Here is a guide to where to find them and how to use them.
1. Problem Steps Recorder
 Problem
Steps Recorder is a great solution to get a detailed description of the
problem, so that you can either review the report yourself or send it
to a tech support team.
Basically, this tool records everything happening on the computer that
needs troubleshooting. It records all mouse clicks and everything that
is pressed on the keyboard, takes screenshots, and then saves the report
as a zipped MHTML file. This file can be easily emailed and analyzed.
To enable Problem Steps Recorder, click on Start, type PSR and hit
Enter. Then click on Start Record. To save a report, just stop recording
your computer activity.
Problem
Steps Recorder is a great solution to get a detailed description of the
problem, so that you can either review the report yourself or send it
to a tech support team.
Basically, this tool records everything happening on the computer that
needs troubleshooting. It records all mouse clicks and everything that
is pressed on the keyboard, takes screenshots, and then saves the report
as a zipped MHTML file. This file can be easily emailed and analyzed.
To enable Problem Steps Recorder, click on Start, type PSR and hit
Enter. Then click on Start Record. To save a report, just stop recording
your computer activity.
2. Troubleshoot problems
If something in Windows 7 starts behaving in a weird way and you have no idea why, go to the Control Panel, locate the “Find and fix problems” (Troubleshooting) option and you’ll be able to access the Windows 7 troubleshooting tools. They are easy-to-use wizards and can fix common problems, clean your system, check your settings, and lots more.
3. Discover bottlenecks
Under normal circumstances, Windows 7 easily outperforms Vista and XP. Nevertheless, your computer can still seem too slow from time to time. Most likely it’s an application or a process that’s slowing you down. Windows 7 makes it really easy to find bottlenecks with the help of Resource Monitor. Just click on Start, type RESMON and hit Enter to launch the tool. When it opens, click on the CPU, Memory, Disk and Network tabs to see which processes are hogging your system and using up your bandwidth. When you find the process that’s holding you back, you’ll be able to try to fix it right from the Resource Monitor. For example, if a process is locked up, right-click on it and select Analyze to see where the problem lies.
4. Repair your computer
If something goes seriously wrong and Windows 7 fails to start, it might be possible to repair your computer without the installation CD. Just boot your PC and press F8 during startup. You should see an option called Repair Your Computer. Select it and press Enter to see the recovery options Windows 7 has to offer.
These Windows 7 tools will help you troubleshoot and fix a slow computer in a quick and easy way. To prevent your computer from slowing down, use maintenance utilities like disk cleanup and defrag to keep your PC in top shape.
1. Problem Steps Recorder
2. Troubleshoot problems
If something in Windows 7 starts behaving in a weird way and you have no idea why, go to the Control Panel, locate the “Find and fix problems” (Troubleshooting) option and you’ll be able to access the Windows 7 troubleshooting tools. They are easy-to-use wizards and can fix common problems, clean your system, check your settings, and lots more.
3. Discover bottlenecks
Under normal circumstances, Windows 7 easily outperforms Vista and XP. Nevertheless, your computer can still seem too slow from time to time. Most likely it’s an application or a process that’s slowing you down. Windows 7 makes it really easy to find bottlenecks with the help of Resource Monitor. Just click on Start, type RESMON and hit Enter to launch the tool. When it opens, click on the CPU, Memory, Disk and Network tabs to see which processes are hogging your system and using up your bandwidth. When you find the process that’s holding you back, you’ll be able to try to fix it right from the Resource Monitor. For example, if a process is locked up, right-click on it and select Analyze to see where the problem lies.
4. Repair your computer
If something goes seriously wrong and Windows 7 fails to start, it might be possible to repair your computer without the installation CD. Just boot your PC and press F8 during startup. You should see an option called Repair Your Computer. Select it and press Enter to see the recovery options Windows 7 has to offer.
These Windows 7 tools will help you troubleshoot and fix a slow computer in a quick and easy way. To prevent your computer from slowing down, use maintenance utilities like disk cleanup and defrag to keep your PC in top shape.
"Dont forget to subscribe,join my site for new Games and softwares Updates,and to leave comments!"
The reason why most computer malware are so deadly is because many users
fail to recognize whether they have been infected or not. Had they
detected the infection at an earlier stage, the damage caused could have
been greatly reduced. As each virus is programmed differently, it
becomes difficult to identify a virus outbreak. However, there are some
general symptoms that make it easy to detect an infected computer. Here
are some of them:-
1) Programs won't start or crash suddenly: If some system programs like the task manager or registry editor have suddenly stopped working or crash randomly without any visible reason, it is more than likely that your computer has got some form of worm that is attaching itself to various programs and thus, corrupting their code. A virus modifying registry entries to prevent these programs from running could also cause this.
2) Unusual Network Traffic: If even after closing your browser and other applications that may use the internet, you see that your computer is still downloading or uploading anything, then your computer is possibly infected with some form of spyware that is either downloading other viruses to your computer or is uploading your private information to a remote computer. In case you use a wifi connection, it is also possible that your neighbors are using your network.

3) Internet Connection not available or is slow: If suddenly, your internet connection has stopped working or has become extermely slow, it is possible that a malware is the cause. However, problems with your internet service provider could also be the cause of such issues.
4) Annoying Popups or Redirection to Strange Websites: If there has been an increase in the number of annoying popups while browsing the internet or your web browser redirects you to a different website from the one you wanted to visit, a virus or adware might be the cause.
5) Computer won't boot: If your computer has suddenly stopped booting, it is possible that some malware has modified your computer's system files. In such a situation, re-installing or repairing your operating system might be the only solution.
6) Slow Computer: Some viruses are designed specifically for this purpose. Malware programmers achieve this by designing viruses that increase your CPU's usage level to 100%. If on running the Task Manager, you find that your CPU's usage is constantly at 100% level, a malware might be the cause.

7) Programs start automatically: Some viruses and adware automatically start strange programs on your computer in order to show unwanted advertisements or simply to frustrate users.
8) Unusual File Associations: Some viruses change .exe or other file associations which prevents these files from opening. Some viruses also do this to automatically start themselves when a file of a particular type is started.
9) Security Software Disabled: Most malware disable antiviruses and firewalls to prevent themselves from being detected. If only a single software stops working, it might be a specific software failure issue. If it is a general trend and almost every security software is facing this issue, a virus infection is most likely.
10) Weird Behaviour: If your computer automatically starts sending emails or opens strange applications randomly or does things different from its "normal" behaviour, your computer is most likely compromised by malware.
Most malware infections can however be avoided by using a powerful antivirus software and following some best security practices.
1) Programs won't start or crash suddenly: If some system programs like the task manager or registry editor have suddenly stopped working or crash randomly without any visible reason, it is more than likely that your computer has got some form of worm that is attaching itself to various programs and thus, corrupting their code. A virus modifying registry entries to prevent these programs from running could also cause this.
2) Unusual Network Traffic: If even after closing your browser and other applications that may use the internet, you see that your computer is still downloading or uploading anything, then your computer is possibly infected with some form of spyware that is either downloading other viruses to your computer or is uploading your private information to a remote computer. In case you use a wifi connection, it is also possible that your neighbors are using your network.
3) Internet Connection not available or is slow: If suddenly, your internet connection has stopped working or has become extermely slow, it is possible that a malware is the cause. However, problems with your internet service provider could also be the cause of such issues.
4) Annoying Popups or Redirection to Strange Websites: If there has been an increase in the number of annoying popups while browsing the internet or your web browser redirects you to a different website from the one you wanted to visit, a virus or adware might be the cause.
5) Computer won't boot: If your computer has suddenly stopped booting, it is possible that some malware has modified your computer's system files. In such a situation, re-installing or repairing your operating system might be the only solution.
6) Slow Computer: Some viruses are designed specifically for this purpose. Malware programmers achieve this by designing viruses that increase your CPU's usage level to 100%. If on running the Task Manager, you find that your CPU's usage is constantly at 100% level, a malware might be the cause.
7) Programs start automatically: Some viruses and adware automatically start strange programs on your computer in order to show unwanted advertisements or simply to frustrate users.
8) Unusual File Associations: Some viruses change .exe or other file associations which prevents these files from opening. Some viruses also do this to automatically start themselves when a file of a particular type is started.
9) Security Software Disabled: Most malware disable antiviruses and firewalls to prevent themselves from being detected. If only a single software stops working, it might be a specific software failure issue. If it is a general trend and almost every security software is facing this issue, a virus infection is most likely.
10) Weird Behaviour: If your computer automatically starts sending emails or opens strange applications randomly or does things different from its "normal" behaviour, your computer is most likely compromised by malware.
Most malware infections can however be avoided by using a powerful antivirus software and following some best security practices.
"Dont forget to subscribe,join my site for new Games and softwares Updates,and to leave comments!"
Chances are if you have a wireless internet connection at your home, you
have had some trouble with the speed of the connection at least once
before. That being said, a slow wireless connection can be frustrating
to deal with. You are probably paying good money to your internet
service provider, so slow speed is something you should not have to deal
with, right? Well, the truth is wireless speed can be affected by a
number of things. Luckily there are some Wi-Fi tweaks you can try that
should help boost your speed and get you rolling in no time.
1. Reposition Your Router
The position of your wireless router plays a major role in the speed and strength of your wireless connection. If you are having trouble, you should try to reposition your router in a centrally located area, where the signal can equally reach each wireless device in your house. If your router is near an outside wall, try to move it closer to the middle of your house. Routers that are placed near outside walls can send some of the signal outside, which can risk your wireless connection’s strength and speed.
2. Purchase a Wireless Signal Repeater
Adding a wireless signal repeater to your home network can greatly increase the speed of your connection. A repeater works by extending your signal without having to add any additional wires. All you have to do is simply place the wireless repeater in a location that is between your router and your wireless device(s). It will instantly boost the wireless signal that is sent from the router to your devices, meaning faster speeds for you.
3. Install a New Antenna
Most wireless routers come standard with an omnidirectional antenna, meaning it broadcasts the wireless signal in a circular radius to reach various places in your home. If your router is in a perfectly centered location between all of your wireless devices, this is probably fine. But if your router isn’t perfectly centered among devices, you should think about replacing the existing antenna with a stronger one, known as a high-gain antenna. You can usually remove your old antenna and replace it with one of these stronger antennas to boost your signal strength, therefore increasing the speed of your connection. Another perk of a high-gain antenna is its ability to focus the wireless signal in any direction you prefer.

4. Use One Brand of Equipment
You may not think that using different brands of equipment can reduce the speed of your wireless connection, but in reality it can. If you use different brands of equipment, your components may not work as efficiently. This is because many manufacturers of wireless networking equipment pre-install enhancements in all of their products. These enhancements can boost speed, but will only work if products from the same manufacturer are used simultaneously. If you are using various brands of equipment and your speed is suffering, this is definitely worth a try.
5. Reduce Frequency Interference
Many household electronics, such as cordless telephones and baby monitors, run at the same frequency as wireless routers. This means that these electronic devices can interfere with the wireless signal that is being broadcast from your router, which can affect the speed and performance of your connection. Check the box of your router to see what frequency it runs at, and try to avoid using other electronic devices that operate at the same frequency. You can also try to change the channel on your router to avoid frequency interference.
6. Check for Firmware or Driver Updates Regularly
The manufacturers of wireless routers and network adapters often release firmware or driver updates that can improve the function of your wireless connection. You can find and download these updates at the manufacturers’ websites. Updates are usually done to fix issues, add features, and strengthen your equipment’s performance. Check for these updates on a regular basis to make sure your firmware and drivers are always kept up to date.
7. Secure Your Wireless Network
If your network is not properly secured, neighbors could be using your signal. This can reduce the speed of your connection because you are in a sort, sharing the wireless signal. Set up secure passwords and some sort of wireless encryption that will prevent anyone else from accessing your wireless network. All of these Wi-Fi tweaks can greatly boost the speed of your wireless connection. If one of them does not seem to do the trick, try another or even a multitude of options. It may take a little time and patience, but once you figure out what works to speed up your connection, you will be happy you put forth the effort.
1. Reposition Your Router
The position of your wireless router plays a major role in the speed and strength of your wireless connection. If you are having trouble, you should try to reposition your router in a centrally located area, where the signal can equally reach each wireless device in your house. If your router is near an outside wall, try to move it closer to the middle of your house. Routers that are placed near outside walls can send some of the signal outside, which can risk your wireless connection’s strength and speed.
2. Purchase a Wireless Signal Repeater
Adding a wireless signal repeater to your home network can greatly increase the speed of your connection. A repeater works by extending your signal without having to add any additional wires. All you have to do is simply place the wireless repeater in a location that is between your router and your wireless device(s). It will instantly boost the wireless signal that is sent from the router to your devices, meaning faster speeds for you.
3. Install a New Antenna
Most wireless routers come standard with an omnidirectional antenna, meaning it broadcasts the wireless signal in a circular radius to reach various places in your home. If your router is in a perfectly centered location between all of your wireless devices, this is probably fine. But if your router isn’t perfectly centered among devices, you should think about replacing the existing antenna with a stronger one, known as a high-gain antenna. You can usually remove your old antenna and replace it with one of these stronger antennas to boost your signal strength, therefore increasing the speed of your connection. Another perk of a high-gain antenna is its ability to focus the wireless signal in any direction you prefer.
4. Use One Brand of Equipment
You may not think that using different brands of equipment can reduce the speed of your wireless connection, but in reality it can. If you use different brands of equipment, your components may not work as efficiently. This is because many manufacturers of wireless networking equipment pre-install enhancements in all of their products. These enhancements can boost speed, but will only work if products from the same manufacturer are used simultaneously. If you are using various brands of equipment and your speed is suffering, this is definitely worth a try.
5. Reduce Frequency Interference
Many household electronics, such as cordless telephones and baby monitors, run at the same frequency as wireless routers. This means that these electronic devices can interfere with the wireless signal that is being broadcast from your router, which can affect the speed and performance of your connection. Check the box of your router to see what frequency it runs at, and try to avoid using other electronic devices that operate at the same frequency. You can also try to change the channel on your router to avoid frequency interference.
6. Check for Firmware or Driver Updates Regularly
The manufacturers of wireless routers and network adapters often release firmware or driver updates that can improve the function of your wireless connection. You can find and download these updates at the manufacturers’ websites. Updates are usually done to fix issues, add features, and strengthen your equipment’s performance. Check for these updates on a regular basis to make sure your firmware and drivers are always kept up to date.
7. Secure Your Wireless Network
If your network is not properly secured, neighbors could be using your signal. This can reduce the speed of your connection because you are in a sort, sharing the wireless signal. Set up secure passwords and some sort of wireless encryption that will prevent anyone else from accessing your wireless network. All of these Wi-Fi tweaks can greatly boost the speed of your wireless connection. If one of them does not seem to do the trick, try another or even a multitude of options. It may take a little time and patience, but once you figure out what works to speed up your connection, you will be happy you put forth the effort.
"Dont forget to subscribe,join my site for new Games and softwares Updates,and to leave comments!"
As great as smart phones have become when it comes to handling our
digital lives, there are still a few tiresome concessions we make for
their use. One is having to plug our device into our computer in order
to transfer files. Some manufacturers such as Apple have launched new
services to alleviate that using cloud computing. Here is one way you
can send files to your Android based phone completely free without the
help of a USB cable.
Step 1: On your computer, navigate to dropbox.com and download the application installer.
Step 2: Once the application has been downloaded, run it and an initial set up wizard should begin.
Step 3: Using the initial set up wizard, create a Dropbox account by entering your name, email address and computer name.
Step 4: A folder called Dropbox should now be available on your computer. Put any file you wish to wirelessly send to your phone in this folder.
Step 5: On your Android phone, open your App drawer and open the Market application.
Step 6: Search for Dropbox and install the application.
Step 7: Once installed, return home and re-open your App drawer and start up the Dropbox app.
Step 8: Tap the existing Dropbox account button and log in using the account you just created in step 3.
You should now see any files you have in the Dropbox folder. Transferring additional files to your phone wirelessly is now as easy as dragging them into the folder and starting the app on your phone. Dropbox allows you to send up to 2GBs of data for free. Any files larger than that will either have to be transferred via hard connection or you’ll have to sign up for a 50 or 100 GB plan.
 |
| Transferring files wirelessly on Android using Dropbox is easy |
Step 1: On your computer, navigate to dropbox.com and download the application installer.
Step 2: Once the application has been downloaded, run it and an initial set up wizard should begin.
Step 3: Using the initial set up wizard, create a Dropbox account by entering your name, email address and computer name.
Step 4: A folder called Dropbox should now be available on your computer. Put any file you wish to wirelessly send to your phone in this folder.
Step 5: On your Android phone, open your App drawer and open the Market application.
Step 6: Search for Dropbox and install the application.
Step 7: Once installed, return home and re-open your App drawer and start up the Dropbox app.
Step 8: Tap the existing Dropbox account button and log in using the account you just created in step 3.
You should now see any files you have in the Dropbox folder. Transferring additional files to your phone wirelessly is now as easy as dragging them into the folder and starting the app on your phone. Dropbox allows you to send up to 2GBs of data for free. Any files larger than that will either have to be transferred via hard connection or you’ll have to sign up for a 50 or 100 GB plan.
"Dont forget to subscribe,join my site for new Games and softwares Updates,and to leave comments!"
Windows Task Manager is used to view details about processes running on
your computer. Since it can be used to terminate programs that are
misbehaving or are viruses disguised in the form of harmless programs,
most spyware and viruses disable it to prevent themselves from being
closed through it. Some administrators also disable Task Manager to
prevent users from closing important security programs like antiviruses
and anti-malwares.
In such situations, running the Task Manager will give the "Task Manager has been disabled by Administrator" error. However, there are some techniques you can use to re-enable task manager and close those harmful programs manually. This article contains few such simple techniques you can use to regain access to Task Managing privileges.

Group Policy Editor is a feature in Windows which is
used to edit local policy settings. It can also be used to enable Task
Manager. To do so, just follow the steps given below:-
In such situations, running the Task Manager will give the "Task Manager has been disabled by Administrator" error. However, there are some techniques you can use to re-enable task manager and close those harmful programs manually. This article contains few such simple techniques you can use to regain access to Task Managing privileges.
Enable Task Manager from Registry in Windows 8, 7, XP or Vista
Registry Editor is an inbuilt Windows tool that is used to modify registry keys which tell Windows how it should work. A simple registry modification can be used to bypass the Task Manager block. To do so, just follow the steps:-- Click on Start. Go to Run. If you use Windows 8, Windows 7 or Windows Vista, go to Search.
- Type regedit and press Enter. Registry Editor will start. If Registry Editor is also disabled, you will first need to enable registry editing.
- Through the left hand navigation pane, navigate to HKEY_CURRENT_USER\Software\Microsoft\ Windows\ Current Version\Policies\System. If the System key is not there, you will need to create it.
- In the work area, locate "DisableTaskMgr". If this value is not there, you will need to create a new DWORD value called DisableTaskMgr. Double click on it. A window will pop up.
- Enter its value data as 0 and press OK.
- Close Registry Editor. If Task Manager is still disabled, restart your computer.
Enable Task Manager from Group Policy Editor (Gpedit.msc)
 |
| Windows Task Manager in Windows 7 |
- Open Start Menu. Windows XP users click on Run. Windows 8, Windows 7 and Vista users, go to Search.
- Type gpedit.msc and press Enter. Group Policy Editor Window will show up.
- From the navigational pane at the left hand side, go to: User Configuration>Administrative Templates>System>Ctrl+Alt+Del Options.
- In the work area, double click on "Remove Task Manager" and set its value to Disabled or Not Configured.
- Restart your Computer or Log Off and Log back On to apply the changes.
Enable Task Manager by Running a CMD Command
Command Prompt can also be used to directly enable Task Manager.- Open Notepad.
- Copy the code given below and paste it.
- Save the File as TaskManager.bat.
- Run TaskManager.bat as Administrator if you use Windows 8, Windows 7 or Windows Vista. In Windows XP, simply open the file. A command prompt window will flash for a second and then disappear indicating successful execution. After running the batch file, you will be able to again use Task Manager. If Task Manager is still not available, restart your computer.
REG add HKCU\Software\Microsoft\Windows\CurrentVersion\Policies\System /v DisableTaskMgr /t REG_DWORD /d /0 /f
Create a Registry(.reg) file for enabling Task Manager
If you are unfamiliar with manually editing the Registry, you can create a Registry file which will automatically modify the Registry Key to re-enable Task Managing. To create one such file:-- Open Notepad or any other text editor.
- Copy the code given below and paste it as it is in it.
- Save the file as Enable Task Manager.reg or *.reg.
- Open the file by double clicking on it.
- Registry Editor will ask you for confirmation. In the confirmation Window, click Yes.
- Task Manager would immediately be accessible. If it is not, restart your computer.
Windows Registry Editor Version 5.00 [HKEY_CURRENT_USER\Software\Microsoft\Windows\CurrentVersion\Policies\System] “DisableTaskMgr” =dword:00000000
"Dont forget to subscribe,join my site for new Games and softwares Updates,and to leave comments!"
A while ago on Technology Inspired, I published an article on changing
your processor name. But recently, Technology Inspired reader Anil Kumar
pointed out that the trick only changed the name temporarily.
After a user restarts his computer, the name reverted back to original which is obvious as each time Windows boots, it checks the connected hardware and updates the registry value automatically. So, changing the processor name using the earlier article did not had permanent effect on the processor name.
Thus, the alien processor name you had earlier again reverted back to the boring old one.
Problem: To, make the name change permanent, it was required that the user updates the Processor Name String registry key each time when Windows starts.
Solution: It is very easy to change your processor name permanently by creating a registry key and placing a shortcut to it in the windows start up folder. To do so, just follow the steps given below:-
Steps :-
1. Open Notepad.
2. Copy and paste the exact code given below:-
3. Click on File Menu, click on Save As and select "All Types" in Save as Type option. Save the file as ProcessorNameChange.reg or *.reg.
4. Create a new shortcut on your desktop. Enter regedit / S "Location of the .reg file" as the location of the item. For example, enter regedit /S "C:\Processor Name.reg" if your registry file is located in the root of C:\ drive.
5. Copy the created Shortcut file.
6. Navigate to C:\Documents and Settings\All Users\Start Menu\Programs\Startup (in Windows XP) or to C:\Users\ User-Name\AppData\Roaming\Microsoft\Windows\Start Menu\Programs\Startup (in Windows 8, Windows 7 and Windows Vista. Also remember that AppData is a hidden folder.) if C: is your System drive.
7. Paste the copied file.
This registry file would now execute each time when windows starts and the Processor Name String would be modified each time. So, even upon restarting your computer, you will see that the changed processor name is permanent.
After a user restarts his computer, the name reverted back to original which is obvious as each time Windows boots, it checks the connected hardware and updates the registry value automatically. So, changing the processor name using the earlier article did not had permanent effect on the processor name.
Thus, the alien processor name you had earlier again reverted back to the boring old one.
Problem: To, make the name change permanent, it was required that the user updates the Processor Name String registry key each time when Windows starts.
Solution: It is very easy to change your processor name permanently by creating a registry key and placing a shortcut to it in the windows start up folder. To do so, just follow the steps given below:-
Steps :-
1. Open Notepad.
2. Copy and paste the exact code given below:-
Windows Registry Editor Version 5.00To change the processor name, edit the part of the code given in blue. Also understand that \0 in the above code should only be present if Windows store your processor name at that location. Please open Registry Editor and navigate to the above mentioned keys to check whether or not to include the \0.
[HKEY_LOCAL_MACHINE\HARDWARE\DESCRIPTION\System\CentralProcessor\0]
"ProcessorNameString"="My Processor name 50000MHz"
3. Click on File Menu, click on Save As and select "All Types" in Save as Type option. Save the file as ProcessorNameChange.reg or *.reg.
4. Create a new shortcut on your desktop. Enter regedit / S "Location of the .reg file" as the location of the item. For example, enter regedit /S "C:\Processor Name.reg" if your registry file is located in the root of C:\ drive.
5. Copy the created Shortcut file.
6. Navigate to C:\Documents and Settings\All Users\Start Menu\Programs\Startup (in Windows XP) or to C:\Users\ User-Name\AppData\Roaming\Microsoft\Windows\Start Menu\Programs\Startup (in Windows 8, Windows 7 and Windows Vista. Also remember that AppData is a hidden folder.) if C: is your System drive.
7. Paste the copied file.
This registry file would now execute each time when windows starts and the Processor Name String would be modified each time. So, even upon restarting your computer, you will see that the changed processor name is permanent.
"Dont forget to subscribe,join my site for new Games and softwares Updates,and to leave comments!"
Are you bored with your old processor? Do you want a new processor with a
breath-stopping name but are not going to upgrade any time soon? No
need to worry. You can still have that new processor's name displayed in
your computer. Well not only that, you can also have a better one than
the one you are supposing to buy. Just follow this trick.
With this trick, you can change the name of your processor to a personalized one like My Processor or something extreme like Decacore Processor 50 GHz . These are just a few examples. You can change the name of your processor to anything you like.

Right Click on Computer icon and select properties.The final outcome would be something like the one in the image.
Try it on your PC and show it to your friends to see the fun.
P.S.: Personally, I have recently changed the name of my processor to "iLife Processor 7, Alien Technologies". Tell me what you change yours to.
With this trick, you can change the name of your processor to a personalized one like My Processor or something extreme like Decacore Processor 50 GHz . These are just a few examples. You can change the name of your processor to anything you like.
To have one such cool processor's name displayed in your computer, follow these steps:-
- Click on Start.
- Click on Run.
- Type "regedit" without quotes.
- Navigate to HKEY_LOCAL_MACHINE/HARDWARE/
- From HARDWARE, navigate to DESCRIPTION/System/CentralProcessor/.
- In the work area, double click on ProcessorNameString, and change its value according to your choice.
- Click OK
Right Click on Computer icon and select properties.The final outcome would be something like the one in the image.
Try it on your PC and show it to your friends to see the fun.
P.S.: Personally, I have recently changed the name of my processor to "iLife Processor 7, Alien Technologies". Tell me what you change yours to.
"Dont forget to subscribe,join my site for new Games and softwares Updates,and to leave comments!"
Subscribe to:
Comments (Atom)