Wednesday, 30 January 2013
These handy tools have a stylus for drawing on your iPad - plus a normal ink pen for writing on paper, too.
1. Kensington Virtuoso Metro Stylus And Pen For Tablets
Price: £15 - Manufacturer: Kensington – Website: kensington.com
While most pen-styluses seem to be styluses that someone's hollowed-out and jammed a standard ballpoint cartridge in, what makes us love the Virtuoso Metro so much is that it's first and foremost a really comfortable pen to use. You don't feel like you're gripping a stunted little twig; it's a proper, chunky pen that's pleasant to write with.
It does depend on how much time you'll spend using each end of the pen, though; using it as a pen is a joy, but flip it around and its chubbiness starts to feel like a drawback. The nib is fat - okay for the iPad, annoying on an iPhone - and it feels ungainly next to the Adonit.
Verdict: This stylus by kensington is one of the best here and is also one of the cheapest.
2. Wacom Bamboo Stylus Duo
Price: £30 – Manufacturer: Wacom – Website: wacom.com
We're not sure either company would like the comparison, but to us this feels like a posher, better-made and all-round nicer version of the Griffin Stylus + Pen. It feels "premium" - arguably even more so than the Adonit Jot Flip - and the cap is held onto either end with a couple of small, friction-ey rubber rings. It's a small thing, but because you don't get a cheap-sounding click when you put the cap on, it makes using the Bamboo Stylus Duo much nicer.
The stylus nib is still fat compared to the Jot Flip's, but it feels more precise than the others here that use the same rubber nipple design. £30 feels like a lot for something so simple, but it's well-made and nice to use.
3. Incipio Inscribe Dual Ink
Price: £18 – Manufacturer: Incipio – Website: incipio.com
This little left-fielder delighted us. It's short and slim -both things that make it feel a little odd compared to most normal pens - but its metal construction gives it a nice heft that comes as a bit of a surprise given its diminutive size.
But there's a twist - literally. Twist the barrel one way and you get a black pen; twist it the other and you get red. (It squeaks a bit when you twist it, mind you.) We really like that this handy, pocketable gadget packs in, essentially, two pens and a stylus. The stylus is okay, though it lacks the Jot Flip's precision, and you can get the pen itself in black, red or silver finishes.
4. Griffin Stylus + Pen
Price: £12- Manufacturer: Griffin Technology – Website: griffintechnology.com
This is typical of the kind of stylus pen you usually find as soon as you start looking for one. A slim barrel - too slim, perhaps, for some - with a simple rubber nipple at one end and a standard ballpoint at the other.
And that's pretty much it, to be honest. It functions perfectly decently, and it's the cheapest one here - a third the price of the Adonit Jot Flip, for example - but unless you're really counting the pennies, we'd recommend you buy something else.
There's nothing actively bad here - as our three-star rating attests - but it's pretty basic and we didn't find it especially comfortable or pleasant to use.
5. Adonit Jot Flip
Price: £35 - Manufacturer: Adonit – Website: adonit.net
We love the normal Adonit Jot - its clever and surprisingly robust ball-mounted plastic disc at the tip of a fine point gives a kind of precision that we don't see with any other styluses. And so we should love the Jot Flip; it looks and feels just like the normal Jot -wonderfully heavy, and pleasant to use as a stylus - and yet when you twist the barrel, a ballpoint pen slides out. The movement - oddly reminiscent of a hypodermic syringe - is delightful.
For our tastes, though, the nib on the pen is actually too fine. It feels scratchy to us; you may prefer it of course, and you can always replace the pen cartridge with a thicker nib.
"Dont forget to subscribe,join my site for new Games and softwares Updates,and to leave comments!"
Wednesday, 30 January 2013 0
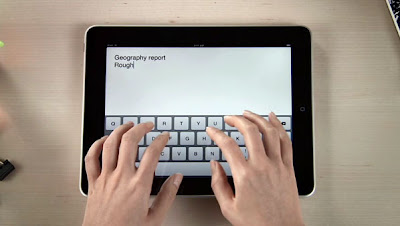
Split the keyboard
Notice the five horizontal lines on the Pad's keyboard icon?
Tap and drag these upwards To split the keyboard in two. Now you can hold your
iPad and type with your thumbs. Drag the lines down again to create a single,
large keyboard.
Auto-complete your sentences
Double-tap the spacebar, and the Phone and iPad will put a
full stop after the last word you type and capitalise the first letter of the
next.
Find hidden keys
Tap and hold a key to bring up special characters -drag your
finger to the one you want and let go to insert it. On the iPad, if you tap the
key and flick your finger upwards, it'll insert the first character.
Create your own shortcuts
In Settings > General > Keyboard, you can add shortcuts
that are letter combinations for your device to automatically turn into a
phrase. For instance, 'Omw' means' On my way; but you can tap Add New
Shortcut... to make your own. Don't use common words as the shortcut though,
otherwise you'll end up sending a phrase.
"Dont forget to subscribe,join my site for new Games and softwares Updates,and to leave comments!"

Make sure your child can't access anything on the iPad that
you wouldn't want them to. Here's how to use its parental controls...
1- To enable child restrictions on your iPad, tap Enable
Restrictions and choose a four-digit security code. This must be entered every
time you want to make any changes to your settings.
2- Once restrictions are enabled, you can disable whole
applications, such as Safari, YouTube and iTunes, forbid App Store
installations, explicit music or podcasts, and switch off the location
features.
3- Ratings can be tailored for specific territories, with
options for Australia, Canada, France,
Germany, Ireland, Japan,
New Zealand, the UK and the US - so wherever you are you can
stay safe.
4- Choosing your home territory will let you pick from
restrictions that match your local ratings. So, pick UK and you'll have movie ratings of
U, Uc, PG, 12, 12A, 15 and 18 to choose from.
5- Likewise, in the UK you can allow all or no TV
shows, or just those rated for 'Caution'. Music and Podcasts can be similarly
filtered too.
6- You can choose six options for applications -Don't Allow
Apps, 4+, 9+, 12+, 17+ or Allow All Apps. These match Apple's own ratings
system.
"Dont forget to subscribe,join my site for new Games and softwares Updates,and to leave comments!"
Most modern browsers offer the capability of remembering usernames and
passwords. Most of us use this feature to automatically save our
usernames and passwords in order to log in to our favorite websites more
quickly. What if you forget the saved username and password?
As web browsers intelligently hide passwords using stars(, asterisks or dots), there is no way in which a user can recover his password by simply looking at what the browser shows. Here are some tips and tricks that you can use to reveal your password for a website when you have forgotten it but your browser remembers it.
Asterisk Logger:Asterisk Logger from Nirsoft is one such software. It automatically displays the hidden password whenever a window containing a hidden password is detected.
Password Viewer:Password Viewer by IT Samples is another application that can be used to unmask passwords hidden behind stars. It allows you to view passwords not only in web browsers but also in any program that might be masking passwords from the user.
Both of these software are free and do not require to be installed. All you need to do is just unzip the file and run them. These software work perfectly fine on Windows XP, Windows 7, Windows Vista and Windows Server 2008, 2003. However, in Windows 7 and Vista, they are required to be used in an Administrator Account. These tools are browser independent. These software will not be able to decrypt or show User Account Control /Windows logon password.
Related: 5 Essential free Software for Windows PC
These tips can be also be used by someone else to hack your passwords. To avoid such mishaps, I would advise you to stay alert when others use your private computer.
As web browsers intelligently hide passwords using stars(, asterisks or dots), there is no way in which a user can recover his password by simply looking at what the browser shows. Here are some tips and tricks that you can use to reveal your password for a website when you have forgotten it but your browser remembers it.
 |
| Enter your Password! |
JavaScript to Reveal Hidden Passwords in Asterisk (Stars)
A simple JavaScript code can be used to view passwords in web browsers like Google Chrome, Internet Explorer, Opera in a popup as an alert message (Mozilla Firefox does not support this. Users of this browser can utilize the bookmarklet given below or the addon mentioned at the end of this post. If you use Google Chrome and the code does not seem to work, precede it with "javascript:" without quotes). To use the JavaScript, open your web browser, open the webpage for which the password is hidden in asterisks, copy and paste the following code in the address bar.javascript: var p=r(); function r(){var g=0;var x=false;var x=z(document.forms);g=g+1;var w=window.frames;for(var k=0;k<w.length;k++) {var x = ((x) || (z(w[k].document.forms)));g=g+1;}if (!x) alert('Password not found in ' + g + ' forms');}function z(f){var b=false;for(var i=0;i<f.length;i++) {var e=f[i].elements;for(var j=0;j<e.length;j++) {if (h(e[j])) {b=true}}}return b;}function h(ej){var s='';if (ej.type=='password'){s=ej.value;if (s!=''){prompt('Password found ', s)}else{alert('Password is blank')}return true;}}Or, alternatively you can use this Show Password Bookmarklet by dragging it to your Bookmarks Bar to instantly view hidden passwords at the click of a button.
 |
| Asterisk Password Recovery Popup in Google Chrome |
Software to Reveal Hidden Passwords behind Stars
There are many free software that you can use to recover forgotten passwords. Some of them are:-Asterisk Logger:Asterisk Logger from Nirsoft is one such software. It automatically displays the hidden password whenever a window containing a hidden password is detected.
Password Viewer:Password Viewer by IT Samples is another application that can be used to unmask passwords hidden behind stars. It allows you to view passwords not only in web browsers but also in any program that might be masking passwords from the user.
Both of these software are free and do not require to be installed. All you need to do is just unzip the file and run them. These software work perfectly fine on Windows XP, Windows 7, Windows Vista and Windows Server 2008, 2003. However, in Windows 7 and Vista, they are required to be used in an Administrator Account. These tools are browser independent. These software will not be able to decrypt or show User Account Control /Windows logon password.
Related: 5 Essential free Software for Windows PC
Mozilla Firefox Add-on
Show My Password is a Firefox Add-on which automatically converts scrambled hidden passwords into human readable form. To use this nifty add-on, just open the webpage with the hidden password and click in the field containing the hidden password. This add-on will automatically reveal the password to you.These tips can be also be used by someone else to hack your passwords. To avoid such mishaps, I would advise you to stay alert when others use your private computer.
"Dont forget to subscribe,join my site for new Games and softwares Updates,and to leave comments!"
With this trick, you can disable access to your USB(Universal Serial
Bus) ports in your Windows based PC to prevent people from taking out
data from your personal computer without permission or spreading viruses
through the use of USB(pen and flash) drives.
To use this trick to disable USB ports, follow the steps given below:-

Try it yourself to make your PC invulnerable from data theft and malware which spread through USB ports. This works on Windows XP, Windows Vista, Windows 7 and Windows 8.
Note: This trick also disables access to your USB connected peripheral devices. So, do not use it if you have USB connected keyboard and mouse.
To use this trick to disable USB ports, follow the steps given below:-
- Click on Start.
- Click on Run. If you cannot find RUN, type it in the search box.
- Type "regedit" without quotes. This will launch the Registry Editor.
- Navigate to HKEY_LOCAL_MACHINE\SYSTEM\CurrentControlSet\Services\usbstor.
- In the work area, double click on Start.
- In the Value Data box, enter 4.
- Click on OK.
- Close Registry Editor and refresh your desktop.
- To re-enable access to your USB ports, enter 3 in the Value Data box in Step 6.
Try it yourself to make your PC invulnerable from data theft and malware which spread through USB ports. This works on Windows XP, Windows Vista, Windows 7 and Windows 8.
Note: This trick also disables access to your USB connected peripheral devices. So, do not use it if you have USB connected keyboard and mouse.
"Dont forget to subscribe,join my site for new Games and softwares Updates,and to leave comments!"
Tuesday, 29 January 2013

Cloud computing is the buzzword of the moment, but is cloud hosting always the best option for ecommerce sites? The online gift experience retailer Wish.co.uk, which has enjoyed a rapid growth in popularity since its launch in 2011, has returned to using a dedicated server hosted by Memset after trying out the cloud and finding it inadequate. What can online businesses learn from the experience of Wish.co.uk in the cloud?
Cloud Server Vs Dedicated Server
There are a number of differences between cloud servers and dedicated servers, which ecommerce business owners need to understand so they can decide which type of hosting is most appropriate for their business.
Cloud servers are designed to be quick and easy to set up. This ease of use makes cloud servers very attractive to new start-ups, who are looking to get their businesses launched with the minimum of hassle. Dedicated servers, on the other hand, require more advanced skills, but they also offer greater control and often provide better reliability and security.
Sharing Space in the Cloud
A cloud server is a virtual server that is spread over many connected physical servers. The network of physical servers, known as the cloud, has a vast amount of resources. The aim of cloud hosting is to spread the hosting of a particular website across the entire cloud, utilizing any available computing power to handle user requests. The flexibility of this approach allows the cloud hosting provider to host many more websites than a provider that allots each user their own dedicated space on a server, which drives down the cost of cloud hosting. Many new online businesses choose to host their site on a cloud server in order to save money.
Every Silver Lining Has a Cloud
The downside of cloud hosting, as Wish.co.uk found out, is that sometimes it simply isn’t up to the job of coping with high traffic volumes. This problem is shared by many online businesses as their popularity begins to spike. A sudden upswing in traffic can lead to unexpected downtime, which is the worst possible outcome for an ecommerce site that has been working hard to get noticed on social media or in the press. Persuading web surfers to click through to an ecommerce site only to be greeted by an error or a site that runs at a frustratingly slow speed results in lost sales and severe disappointment for business owners. Traffic levels of other sites sharing the same cloud server can also affect the performance of a site.
Cloud Hosting Case Study – Wish.co.uk
During its first year in business, Wish.co.uk attracted a lot of attention thanks to its savvy PR handling and, of course, the quirky experience days that it sells. Once the world started talking about Wish.co.uk, the cloud server that was hosting the site started to struggle. Tweets from celebrities including Stephen Fry sent huge surges of traffic to Wish.co.uk, requiring the company to scale up their web hosting.
Although many cloud hosting providers do allow their users to boost their resources to deal with high-traffic periods, this service carries an additional fee. Wish.co.uk founder Richard Kershaw, who is himself the publisher of web hosting site WhoIsHostingThis.com, says that from now on he will be sticking with dedicated servers for Wish.co.uk. He says that he enjoys having full control over the business’s hosting without experiencing unexpected bills from having to boost cloud server resources.
When to Choose a Dedicated Server
A dedicated server offers higher capacity and greater resources than a cloud server. Busy ecommerce stores that have extremely high load activities due to large numbers of visitors logging on and making purchases may want to consider using a dedicated server instead of a cloud server as their host. A dedicated server guarantees the speed and reliability that are required by a successful ecommerce business.
Jack Harding is a self-proclaimed “computer nerd,” who enjoys researching the latest ecommerce trends. He also enjoys writing about today’s technology to share with others. To experience a busy ecommerce store in action, see Wish.co.uk.
"Dont forget to subscribe,join my site for new Games and softwares Updates,and to leave comments!"
Tuesday, 29 January 2013 0

Cloud computing has excellent benefits and is becoming popular the world over for its ease of access, but is it safe? One of the major benefits of cloud computing is that it is distributed and accessible anywhere--but this can also create security hazards. To ensure safe cloud computing, you need to use reliable identity verification, such as 2 factor authentication (2fa). Without consistent identity authentication, there's no way of knowing whether the person accessing your secured documents is you, or a hacker trying to get data for their own purposes.
There are many online verification solutions for safe cloud computing, and 2 factor authentication is one of the best methods. With this type of online identity authentication, you prove that you are who you say you are with more than one type of authentication. The two factors are "something you know," and "something you have." The something you know is an item of information, like a password or the answer to a preset security question. The something you have is either a one-time pass code or a physical item such as a USB drive or a smart card.
This type of authentication is so safe because it means that you need both keys -- the thing you have, and the thing you know -- to access your data. The identity verification software will not let anyone pass that doesn't have one or the other. Using a USB drive or smart card for the physical item makes things even safer because it means that a hacker would have to physically steal this item from you.
For ease of use, the "thing you have" can also be a one-time only pass code. This means physical items do not have to be exchanged, but it also means the data can only be accessed once with each code. This makes it trivial to identify if someone else has used your code and accessed your data. It also means that you do not have to worry about someone discovering your pass code, because your pass code will only be usable on one occasion regardless.
As cloud computing becomes more and more prevalent, it becomes even more important to practice safe security measures. By using the correct authentication and identity software you can ensure your data stays safe.
"Dont forget to subscribe,join my site for new Games and softwares Updates,and to leave comments!"

Does it really seem to be impossible to reduce spam comment from a blog? Or do you think that there is nothing you can do to reduce it?
Actually to stop spam commenting finally is a very hard task, but it can be done. Anyway my topic is not covering “How to stop spam commenting finally”, rather “How to reduce spam commenting”.
This is very easy to do, with the measure of some important plugin you can reduce spam commenting. I would like to give you some plugin you can use to do that and also show you how to install those plugin’s for them to work with your blog.
Also before I give you the list of those plugin’s I would also like to tell you one thing that causes spam commenting to increase on your blog.
The number one thing that causes that is because your site has been index on Google and you have also installed the sitemap plugin on your site.
If this two thing has not been done on your blog your site won’t get much spam comment.
For instance; when I created my first blog, by then it wasn’t index on Google I do get comment but not spam comments. Some weeks after I Indexed it on Google I started getting spam comments till the day a discovered the plugin’s that I could use to stop the spam comment. I never rest because I do get more than 50 spam comments per day, but after I installed those plugin’s it minimized.
These are the plugin’s you can use to minimize the spam comment on your blog.
1) conditional captcha:
Using a Conditional Captcha Helps a lot in reducing spam comment from your blog, what you need is to log in to your Administrator account, then go to add plugin, enter “CONDITIONAL CAPTCHA” in the search box, use the very first one that the search brought.
Caution: Do not install any other thing rather that Conditional Captcha.
2) Use Akismet For Your Wordpress Site:
Akismet which is also known as Automattic, is a well know wordpress plugin, it is a spam filtering service. It filters back spam comment from a blog and spam trackback ping.
Akismet was launched in the year 2005, this plugin is a product of Automattic. You can install this plugin by going to add new plugin type “AKISMET” install it then get the API key for it to work on your computer.
Note: You must have the API key before you can use the Akismet spam protector.
3) Turn Off Comment on your site:
This can also help you reduce the spam commenting on your Blog. Although it is not really necessary for you to turn off the comment on your blog because this two listed above plugin’s can reduce the spam commenting on your blog.
If you really want to be getting people’s comment about how your site is then you can leave the comment on, but they can also use the contact page to tell you what they have for you.
"Dont forget to subscribe,join my site for new Games and softwares Updates,and to leave comments!"

A lot of people believe in publishing and
publishing on their site alone which is not the only thing you have to do for
the growth of your site. If you want to increase the traffic of your website
you don’t have to write on you site
alone and do some other things that would be listed below.
I would be listing three tips that would help you
to increase the stat (traffic) of your website. If you are desperate to be
getting lot of visitors on your website you have to work for that.
Tip
#1
Guest
Posting:
guest posting helps a lot in getting traffic’s for a blog, most a time people do guest posting for fun, but it helps a lot. Also for you to see the true help of guest posting you have to guest post on a site that get a better traffic, It is not when you guest post on a site that doesn’t get traffic like yours then you start expecting people to visit your site, that won’t work.
guest posting helps a lot in getting traffic’s for a blog, most a time people do guest posting for fun, but it helps a lot. Also for you to see the true help of guest posting you have to guest post on a site that get a better traffic, It is not when you guest post on a site that doesn’t get traffic like yours then you start expecting people to visit your site, that won’t work.
Guest posting on a site that doesn’t get traffic
will only waist your articles and your time, and as well do nothing useful for
your site.
It might sound funny to a lot of people, that what
is the meaning of this guest posting of a thing. Guest posting is a way in
which you would write an article for another site and add your url to the
article so the readers of the other site would be linking back to your site
with a dofollow link.
Tip
# 2
Always
write cool articles on your site:
Articles also attract visitors from visiting your site when it is index on Google. Guest posting would also let people to read your article by linking back to your site when they find your article interesting they would like to get your next update.
Articles also attract visitors from visiting your site when it is index on Google. Guest posting would also let people to read your article by linking back to your site when they find your article interesting they would like to get your next update.
If your articles are not good enough they would
not like to visit your site again after the first time, that is why you need to
write cool articles on your site even if it is one per day it would still help
you to get visitor from different places.
Tip
#3
For anyone who is good with social media the first thing you would think of is how to invite your friend from your facebook account by creating a facebook page, tweet your site on twitter and share your site on many other social media accounts. This would make your friends visit your site frequently if they see articles that are attractive and interesting.
"Dont forget to subscribe,join my site for new Games and softwares Updates,and to leave comments!"

How
many hours do you spend in front of a computer in a day? If you're like many
people in today's tech-focused world, that number is probably higher than you
realize. Owning and using a computer has become a near necessity in recent
years, and for those who spend significant time in front of a monitor, eye
health can be a constant concern. Though modern computer screens aren't as
damaging as the high contrast, green-on-black screens of the 1980's, they can
still pose problems over time. However, there are many ways you can turn your
computer from an eye health liability into an eye health asset.
Online Resources
Many
programs, documents, and other resources on eye health are easily accessed on
the internet, completely free. You can find simple eye tests like the Amsler
grid at the click of a button. This self-assessment might reveal macular
degeneration you would otherwise be unaware of. One can also find many
informative PDF files like "Finding Your Shades" and "Protecting
Your Vision" with a simple Google search. These files are like the
computer equivalent to the health pamphlets you might pick up in a doctor’s
office, and they're available for almost any health concern you might have. The
truth is, the internet is a nearly infinite resource for bettering your eye
health, but there are other real world actions you can take as well.
Computer Tips
In
addition to knowledge, one can better his or her eye health through many simple
changes in computer usage. One key change is upgrading your computer monitor.
Many modern LCD screens cause a significantly lower amount of eye strain than
older CRT monitors. Also, try to avoid high contrast programs and applications.
If looking at the white-on-black screen of a text editor is strenuous,
reversing that color scheme can be a much needed relief. Make sure you only use
your computer in a well-lit area, and try to take short breaks every once in a
while. For many people, these tips will decrease the eye strain that often
accompanies computer usage, but those of us with existing eye conditions might
still have trouble.
Programs and Products
There
are many innovative products and programs designed to make your computer easier
on your eyes. Some programs such as F.lux, available free at
http://stereopsis.com/flux/, dynamically change the way your monitor looks to
mimic the natural day and night cycle, decreasing eye strain. Some people may
find relief with pinhole glasses, available at www.pinhole-glasses.com,
especially those who suffer from other conditions such as astigmatism. Contact
users might need to schedule an appointment with their optometrist and look
into a different brand or type of contact as constant computer use can cause
excessive dryness and irritation. Still, one thing to remember is that no
solution for computer related eye strain will be perfect for everyone.
Conclusion
Computer
usage is hard on the eyes, and each individual will have to find the solution
that works for him or her. Thankfully, the sum of knowledge that the internet
provides can be an indispensable resource for finding the answers you need.
With a simple search and a few clicks you can find simple tips and tricks to
help make your time using a computer more bearable, and you can even order
products or download programs that will further add to your comfort. Though it
may seem ironic, your computer can be your greatest asset in alleviating
computer related eye problems.
"Dont forget to subscribe,join my site for new Games and softwares Updates,and to leave comments!"

Facebook provides privacy on three basic levels. Firstly, public, here everyone can see the posts made by a person. Secondly, friends setting, here the page can be accessed only by the friends of the user. Thirdly, custom setting, here the user is provided a granular approach when it comes to privacy settings of the user. The custom setting can be experimented with by the user. The custom setting helps you to divide the contacts into various groups depending on work, school and college. This is a very useful feature as it helps the user to know the contacts he has.
Connecting:
The setting helps the user to control the people who can
check the account. The setting also ensures the people who can contact you and
otherwise. This setting much like the previous is divided into friend, public
and custom. It is up to the discretion of the user as to how they want to use
the setting. The feature helps the user to make his account less permissive.
The setting is to help the user understand the benefits and advantages of
having a facebook account. The setting checks unwanted people from accessing
the account of the user.
Tagging and timeline:
Timeline has been recently introduced on facebook.The
feature assures and confirms the people who can put up posts on the timeline of
the user. It Also helps the user to understand whose post they want to be
tagged in or remove the post altogether. The user can in away detag him in case
of any embarrassing post. In case the user chooses the option of no one then
the friends of the user have to tag themselves manually. The setting makes
working easier for the people when it comes to being tagged or otherwise.
Websites apps and ads:
By using the application where the user gets to choose his
apps, the user can select each of the apps and delete each of the apps
separately. The ads setting helps the person the select the ads he would like
to publish on his wall. This setting also helps the person to personalize his
account. This is almost instant and on spot. The setting also helps in going
into the details of one’s own account. The setting helps a person to remove and
confirm the thing that he wants to at his own will. The apps are well adjusted
to the taste of the user using the account.
Limiting the audience and blocking:
The setting helps the
user to limit the viewership of his page or account. Activating this setting
would make using facebook less time consuming. The block option helps the user
to remove unwanted friends from their account easily. It also makes it
impossible for the blocked person to enter the account of the user. The block
is a universal block that helps prevent abusive comments from unwanted people.
The people in the blocked list cannot be added to the user’s friend list unless
they are removed from the blocked list.
"Dont forget to subscribe,join my site for new Games and softwares Updates,and to leave comments!"
Monday, 28 January 2013
Android’s mascot, affectionately known as Bugdroid, has become
instantly recognizable in the mobile world and it has already gone
several transformations to match the dessert a given Android version is
named after. But Bugdroid wasn’t the first mascot.
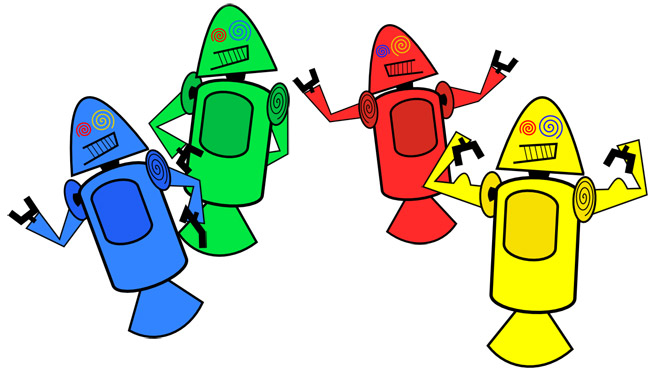
These loopy-looking robots were. They were created by Dan Morrill, who worked in developer relations, when he decided that slides for a presentation to Google’s dev team needed eye candy.
These were never used officially, but apparently they lived long enough to pick up a nickname – Dandroids.
While the Dandroids are not without their charms, I have to say I’m glad Google went with the Bugdroid design (done by Irina Blok).
Mr. Morrill isn’t done with the Android trivia. The second internal developer launch of Android was called R2-D2, short for Release To Developers 2. Due to trademark considerations, Android’s naming scheme moved on to desserts – an idea by Ryan PC Gibson.
Source | Via
"Dont forget to subscribe,join my site for new Games and softwares Updates,and to leave comments!"
Monday, 28 January 2013 0
Just before the announcement storm from CES 2013 to hit, Dropbox has
quietly launched a dedicated Modern UI app for Windows 8 and Windows 8
RT.
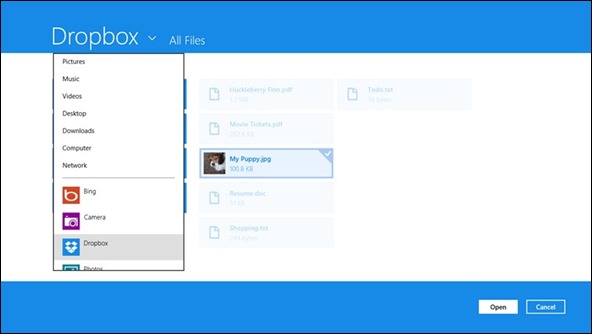
Designed in the familiar Windows 8 manner, the app displays tiles of files and folders from your account. It’s nicely optimized for touch-operation too.

In its initial release, the app is very limited in its functionality. You can search your files using the Search charm or share them via the Share charm.
The app doesn’t support viewing the files that are locally synced on your PC. For that you’ll need to download the classic, non-Modern UI, Dropbox desktop application from the company’s website.
Head down to the Windows Store to download the free Dropbox app for Windows 8.
Via
Designed in the familiar Windows 8 manner, the app displays tiles of files and folders from your account. It’s nicely optimized for touch-operation too.
In its initial release, the app is very limited in its functionality. You can search your files using the Search charm or share them via the Share charm.
The app doesn’t support viewing the files that are locally synced on your PC. For that you’ll need to download the classic, non-Modern UI, Dropbox desktop application from the company’s website.
Head down to the Windows Store to download the free Dropbox app for Windows 8.
Via
"Dont forget to subscribe,join my site for new Games and softwares Updates,and to leave comments!"
The hotly anticipated Android 4.1.2 Jelly Bean
upgrade for the original Galaxy Note might just be around the corner.
Samsung UK has already posted the Jelly Bean manual for Galaxy Note
smartphones, which suggests the rollout should start any moment now.

The Android 4.1.2 Jelly Bean update will bring a lot of new features including some niceties from the company’s latest flagships, Galaxy S3 and Note 2. Samsung is also expected to bring the Nature UX version of TouchWiz UI, along with cool features like direct call and Smart Stay. The S-pen will also learn a few new tricks and there will be some extra apps preinstalled.
As usual, the update will be available over-the-air (OTA) and you can also update their devices via Kies. Unfortunately we do not have any official confirmation regarding the schedule of the rollout.
Source (PDF) | Via
"Dont forget to subscribe,join my site for new Games and softwares Updates,and to leave comments!"
ZTE has unveiled the V81 slate featuring an 8-inch 4:3 display with a
resolution of 1024×768 pixels, which is ready to take on the Apple’s iPad mini and Samsung’s upcoming Galaxy Note 8.0.

The ZTE V81 is powered by a dual-core 1.4GHz processor and comes with 1GB RAM.
The rest of the specs include 4GB of internal storage expandable via a microSD card slot, a 2MP rear and a 0.3MP front snappers, a 3.5mm audio jack, an HDMI port and a 3700 mAh battery. The connectivity package has 3G with HSPA, Wi-Fi, Bluetooth, GPS and USB. There is no info on GSM connectivity and NFC, so we have to assume they won’t be available on the V81.
ZTE V81 stands at 200x156x11.07 mm and runs on Android 4.1 Jelly Bean.
There is no info on the pricing and availability though. I guess the slate will debut at the MWC next month in Barcelona as ZTE usually brings plenty of new devices to the capital of Catalonia .
Source
"Dont forget to subscribe,join my site for new Games and softwares Updates,and to leave comments!"
Samsung must really love the Garnet Red color – first the
Galaxy S III got that color option, then the Note II and the Galaxy S
III mini followed suit and now it’s turn for the Samsung Galaxy Tab 2 7.0. It’s a special edition that will arrive just in time for a Valentine’s day gift.

The Galaxy Tab 2 7.0 Garnet Red Edition comes with Android 4.1 Jelly Bean out of box (the base model got it as an update) and Samsung is throwing in a matching Garnet Red book cover (those go for $50 if bought separately).

Other than that the device is unchanged – you still get a 7” 1024 x 600 PLS LCD screen (170ppi), dual-core Cortex-A9 CPU and PowerVR SGX540 GPU, microSD card slot and built-in IR remote.
The Samsung Galaxy Tab 2 7.0 Garnet Red Edition will be available at Amazon.com, Walmart, Office Depot, Fry’s, Tiger Direct, Toys”R”Us and other retailers for $220 (keep in mind the $50 cover that comes with it). It’s a limited edition, so it will be available while supplies last. The black and white versions are available as usual ($200, a red book cover is available for $50).
The hardware is a bit old, so before you decide to get one, you should take a look at the Nexus 7 ($200, 216ppi screen, quad-core CPU, no microSD card slot) and the Barnes & Noble Nook HD ($200, 243ppi screen, heavily customized UI). Neither of them is available in red though.
The Galaxy Tab 2 7.0 Garnet Red Edition comes with Android 4.1 Jelly Bean out of box (the base model got it as an update) and Samsung is throwing in a matching Garnet Red book cover (those go for $50 if bought separately).
Other than that the device is unchanged – you still get a 7” 1024 x 600 PLS LCD screen (170ppi), dual-core Cortex-A9 CPU and PowerVR SGX540 GPU, microSD card slot and built-in IR remote.
The Samsung Galaxy Tab 2 7.0 Garnet Red Edition will be available at Amazon.com, Walmart, Office Depot, Fry’s, Tiger Direct, Toys”R”Us and other retailers for $220 (keep in mind the $50 cover that comes with it). It’s a limited edition, so it will be available while supplies last. The black and white versions are available as usual ($200, a red book cover is available for $50).
The hardware is a bit old, so before you decide to get one, you should take a look at the Nexus 7 ($200, 216ppi screen, quad-core CPU, no microSD card slot) and the Barnes & Noble Nook HD ($200, 243ppi screen, heavily customized UI). Neither of them is available in red though.
"Dont forget to subscribe,join my site for new Games and softwares Updates,and to leave comments!"
Sunday, 27 January 2013

There's no denying Kumobius's Time Surfer [$0.99] owes a lot to Tiny Wings [$0.99 / $2.99 (HD)]. It has the same swoopy hills, the same leap-and-glide movement, and the same joy of flight. After that, things go a bit off the proverbial rails.
If the '80s exploded all over Tiny Wings, we'd be part way there. Time Surfer is a glorious mess of bright colors, pixel art and the most upbeat of chiptunes. It's more than that, though. Take the calm simplicity of Tiny Wings, crank up the speed, stick it in space and add a dozen good ways to die. Not so calm, but death is just a state of mind: you can turn it around with the rewind button.
The rewind button is key to the whole Time Surfer experience—you'd only be half a time surfer without it. As you surf you collect gems; these add to a pool you can use for a bit of quick time travel. You can only head back a few seconds, even at full power, but that's often enough to save yourself from death or a bad jump.
More than that, time travel lets you be creative. Given the usual laws of physics, it might be impossible to grab a certain powerup and also manage a perfect curve on your next jump. You, however, aren't limited to the usual laws of physics. Grab that powerup, then rewind and line yourself up for the perfect jump. You have the power.

The advantage is necessary, because Time Surfer is pretty unforgiving. Not only are there pits and spikes out to straight-up kill you—the end of the universe is on your tail. If you start flubbing your jumps and losing speed the end will catch up to you. It can be difficult to tell exactly how far ahead of it you're running, a hassle when compared to Tiny Wings' cut-and-dry night cycle, but you can always rest assured that if you're not doing your best then death won't be far off.
If it's taking too long, you can take the alternative of swiping through the main screen until you find Hell Mode. Feel like you don't see the cute "Death by spikes" graphic often enough? This is where you'll get over that. Hell Mode does away with the scattered pits and instead has spikes everywhere. Everywhere. It's horrifying.
On the rest of the replayability front, missions abound, as do unlockables. Time Surfer gives you cake—you collect it while you play, and earn it whenever you complete a mission. It's used to pay for a collection of fantastic cosmetic options (I'm saving up for the "police box" skin). That'd keep it utterly lacking in controversy but for the pet system.


I'm a sucker for pets, and Time Surfer has such cute ones to share. One unlocks whenever you complete a batch of missions, and each has a more impressive ability than the last. From boosting your speed to plucking you out of a pit, these pets prove their worth again and again—it's just that you have to pay for their services each and every time by feeding them some of your hard-earned cake. None of the pets make or break the game, but it does all feel a touch mercenary. At least I can afford to keep my little buddy the Axolotl along with me every time. I've wanted to hang out with that dude since Bean's Quest [$0.99].
Let's get back to this Tiny Wings thing for a second, though. Time Surfer is far beyond being a lazy retread. The basic mechanical action is the same—touch the screen to pull in tight and gain speed, release to fly— as is the goal. Otherwise, it feels strikingly different to play. Time Surfer is fast, stressful, and intense. These are not words that one would use to describe Tiny Wings. There is no analog to skipping over planets, aliens and asteroids, picking up more and more speed and then launching yourself off the next jump to keep the chain going.
On the flip side, this game has nothing to compare to Tiny Wing's most excellent sensation of soaring. Fly high enough and you'll squish up at the top of the screen for a while. It's uncomfortably confining. Similarly, some of the areas you'll pass through in a run of Time Surfer are choppy, full of short little jumps that are absolute momentum-killers if you don't play perfectly. It's not always a rush of glorious speed. When it is, it's intoxicating.
Before playing Time Surfer, I was a little bummed out that Kumobius was making something in the vein of someone else's classic. That feeling is gone. I get something new and different from playing Time Surfer, a rush that proves there was untapped potential in the formula. The game is vicious, it's ridiculous, and it looks like something that came off a Lisa Frank Trapper Keeper. Execution is half the battle, and Time Surfer nails it.
Mubarizrathores Rating:

"Dont forget to subscribe,join my site for new Games and softwares Updates,and to leave comments!"
Sunday, 27 January 2013 0

UPnP stands for “universal plug and play” and provides a set of standards for the hassle-free sharing of media without the need for manual setup. In essence, UPnP devices are able to see and communicate with one another, and one of the best uses for this technology to stream media around the house.DLNA is an acronym for “Digital Network Living Alliance” and was established by Sony in 2003 to further define (some might say restrict) the sharing of such media. In order to rathore blog UPnP and DLNA-compliant devices you will need a client (known as a renderer) such as a PlayStation 3 or Smart TV and a server which can be hardware-based like a NAS drive or software-based as a service that runs on a PC.
In order to stream to your console or other UPnP renderer you will want a free DLNA server which controls playback. Here is the rathores blog list of free UPnP servers for this purpose.
A Quick Note
Not all DLNA/UPnP devices work with all servers, and this is often down to the client (i.e. Smart TV, games console) than it is the server. Some servers include workarounds to extend support for devices such as this. The rule of thumb is to test servers with your devices – if you find one that fulfills the needs of your household then you should probably stick with it.If a particular server doesn’t seem to like one of your devices then you should probably try another until you find one that does. You might also want to look into a server that transcodes media for compatibility, but ensure your hardware can handle the task.
Serviio (Windows, Mac, Linux)

Serviio is a premium UPnP DNLA-compliant media server with a generous free option. The pro version requires a one-off fee of $25 for access to the MediaBrowser web-based player, API for online access to your media and the ability to control access to shared content. For home users looking to stream their personal connections over a local network, Serviio is a great choice.
Android users can download ServiiDroid, which provides access to the Serviio console on Android devices (and more importantly does not require Pro). Users who do decide to drop $25 can access their media from anywhere via the ServiiGo Android application for the viewing of media away from your local network.
TVMOBiLi (Windows, Mac OS X, Linux)

TVMOBiLi is another premium streamer with decent free option, though it takes a different approach to Serviio. For TVMOBiLi, there are no restrictions over the use of features, and the whole media server is open for use until a user streams over 10GB of data. At this point you must purchase (either at $1.50 monthly fee or a one-off payment of $30) in order to continue use.
Users automatically get a free trial of the premium “unlimited” mode upon installing TVMOBiLi, which gives you a month to decide whether it fits the bill and works with your clients or not. The service claims to support a vast array of media clients and has decent support documentation for a server up and running and resolving any issues.
XBMC (Windows, Mac OS X, Linux + More)

One of the most powerful media centres out there with a huge range of add-ons and open source grunt behind it, XBMC can function both as a DLNA-compliant UPnP server and a client for receiving streams. If you’re a regular reader then you’ll surely know that we’re rather fond of XBMC at rathores blog, with the latest release being faster and prettier than ever.
Setup is as easy as enabling “Share video and music libraries via UPnP” in Network under System in XBMC’s main menu. From then on, your libraries will be easily discoverable on the local network. It’s really that easy!
PS3MediaServer (Windows, Mac OS X, Linux)

Designed to make the most of the PS3’s abilities as a media streamer, PS3MediaServer isn’t strictly limited to Sony’s console in terms of compatibility and has some compatibility with other clients. This is a mature project, with a number of plugins available for streaming from sources such as Grooveshark and SoundCloud as well as some on-demand TV providers.
The blog side of things hasn’t been updated for a few years but the forum community is still very much alive, offering help and tips on getting the server up and running with your devices. There’s a little more tinkering involved here, but if you’ve got a PS3 and would like to use the same streamer for multiple clients then it’s a good option.
MediaTomb (Mac OS X, Linux, FreeBSD)

Another completely free server with transcoding ability, MediaTomb is a highly extensible UPnP solution with binaries for OS X, FreeBSD and a large range of Linux distributions. One of the best things about MediaTomb is the documentation, with detailed instructions about getting devices such as the PS3 and DLNA-enabled TVs working.
The server is configured via a web interface, which provides a straightforward way to manage your media. If you run into problems that the Wiki or FAQ can’t solve then there’s an active forum on which to ask for help.
LXiMediaCenter (Windows, Mac OS X, Linux)

LXiMediaCenter is a UPnP server that always transcodes video, regardless of whether it is in a compatible format or not. This means the requirements for running it are relatively high compared to some of the other servers on this list – so it’s not ideal for older machines. It also uses high quality encoding, so a wired Ethernet or 802.11n connection comes highly recommended.
There are binaries available for Windows, OS X and a number of Linux distributions, making setup easy when coupled with the quick setup guide. The project is still in beta, and thus has not been tested as extensively as some others but it might suit those of you who value high quality streaming with the hardware to support it.
Conclusion
There are more servers for the job, but these are some of the easiest to setup and most effective servers available. Don’t forget that much of the troubles encountered by DLNA clients is down to the clients themselves – much of the time due to not supporting the filetype attempting to be streamed (in which case transcoding is required). Let us know what you use, which you’ve found works best and whether premium options like TVersity are really worth it in the comments, below.
"Dont forget to subscribe,join my site for new Games and softwares Updates,and to leave comments!"
Are you interested in Windows 8, but don’t want to abandon Windows 7 just yet? Well, why not dual-boot Windows 8 and Windows 7, selecting the operating system you want to use each time you turn on your computer? This allows you to test Windows 8 while keeping Windows 7 around as an escape hatch if you want out.
This process will install Windows 8 on its own separate partition, leaving your Windows 7 system intact. All you’ll lose is a bit of space from your Windows 7 partition – just enough to make room for Windows 8. Each Windows installation will have its own programs and settings, although you can access each operating system’s files from the other version of Windows.
A Note About Windows Licensing
If you have an Upgrade edition of Windows 8, installing the upgrade edition in a dual-boot configuration is technically against the license agreement. Microsoft’s Windows 8 Upgrade license agreement states that:The software covered by this agreement is an upgrade to your existing operating system software, so the upgrade replaces the original software that you are upgrading. You do not retain any rights to the original software after you have upgraded and you may not continue to use it or transfer it in any way.If you have a non-upgrade edition of Windows 8, Microsoft’s Windows license agreement allows you to have both installed side-by-side.
Prepare Windows 7
Before you continue, you should ensure you have all your important data backed up. While this process shouldn’t erase any of your data, it’s always possible for something to go wrong when resizing partitions and installing operating systems – better safe than sorry!To make room for Windows 8, press the Windows key, type Disk management, and press Enter. Right-click your Windows 7 C: partition in the Disk Management window and select Shrink Volume.

Windows 8 will need a partition of at least 20 GB in size, and more is better. Shrink the Windows 7 partition to make room for the new Windows 8 partition – for example, if you want about 30 GB of space for your Windows 8 partition, you’d shrink the Windows 7 partition by about 30000 MB.

You’ll see an amount of Unallocated Space when you’re done. This is the space where Windows 8 will be installed – leave it be for now.

Start Windows 8’s Installer
Next, insert the Windows 8 installation disc into your computer’s disc drive and restart your computer to start the installation process.Note that you must boot your computer from the installation media to install Windows 8 in a dual-boot configuration – you can’t start installing it from within Windows 7.
Your computer should automatically boot from the Windows 8 installation media when you restart it. If it doesn’t, press the appropriate key to access your computer’s boot menu and select the installation media or enter the computer’s BIOS (often by pressing Delete or F2 during the boot-up process) and change its boot order. (The required keys are often displayed on-screen during boot. If you don’t see them, consult your computer’s manual.)

Install Windows 8
When the Windows 8 installer screen appears after restarting your computer, go through the installation process as normal. When you see the “Which type of installation do you want?” screen, select Custom – do not select Upgrade or Windows 8 will replace Windows 7 on your system.
On the next screen, select the Unallocated Space we created earlier and click Next.

Windows 8 will now install normally. You can step away from your computer while this process completes.

Dual-Booting
Once Windows 8 is installed, you’ll see the Choose an operating system screen at boot. Every time you boot your computer, you can choose to use Windows 8 or Windows 7. To switch from one Windows installation to another, simply reboot your computer and select the other version of Windows.By default, Windows 8 will boot automatically after a few seconds. If you want to change the default operating system or configure the timer, click the Change defaults or choose other options option at the bottom of this screen.

You’re now able to try out Windows 8 without giving up Windows 7. For more information about Windows 8. You may also want to print out our cheat sheets to Windows 8’s mouse gestures and keyboard shortcuts, which you’ll need to get around Windows 8.
Have you installed Windows 8 in a dual-boot configuration to try it out, or did you go all-in and replaced Windows 7 with it? If so, what do you think? Do you prefer Windows 8, or do you find yourself using Windows 7 more often?
"Dont forget to subscribe,join my site for new Games and softwares Updates,and to leave comments!"
Saturday, 26 January 2013

Skype, the popular application for voice and video calls, supports a range of mobile operating systems, including Android. Unfortunately, the list of supported devices for video calls is limited. This has been a major source of disappointment.
With its recent upgrade, Skype for Android white-listed 14 more devices for video calling, including three tablets running Android Honeycomb: the Samsung Galaxy Tab 10.1, the Motorola Xoom, and the Acer Iconia Tablet. Unfortunately, the video calling option is not enabled by default. This article will walk you through the setup as seen on a Samsung Galaxy Tab 10.1 running Android 3.1 (Honeycomb).
Step 1: Install Latest Version Of Skype For Android
If you don’t have Skype installed yet, navigate to the Android Market on your tablet and search for Skype or simply visit this link to install Skype.
If Skype is already installed on your tablet, check whether it was updated automatically or update the app manually. Navigate to the Android Market and click on > My apps in the top right of your screen.

Select Skype from your list of installed applications and then click a button that says > Update, provided you see it. If you have automatic updates enabled, your Skype will already be up to date. To confirm the version, click on > See details.

Step 2: Enable Video Calling
Open Skype from your apps. While in the Skype menu view (Contacts, Recent, Call Phones and Profile), tab the menu button in the bottom left and open > Settings.
In the Settings view, scroll down to the section that says > Video calls. Check the box for > Enable video calling.

A message may pop up notifying you that the device has not yet been certified to work with Skype. Click > Continue to enable video calls.

While enabling video calling, Skype will automatically reload. Once this procedure has completed, you can go ahead and adjust other video calling settings to meet your preferences or make your first video call with your tablet.

Step 3: Make a Video Call
When you now attempt to call one of your contacts, the > Skype video call option will appear on the list of actions.
While on a video call with a friend, you can tab the screen to switch or turn off the camera. Click the camera icon in the bottom right to access the camera selection. Per default, Skype will use the > Front camera. On tablets featuring a backside camera, you can also switch to the > Back camera.

The new version of Skype supports both portrait and landscape mode for video calls. To switch from one mode to another, enable auto rotation on your tablet and simply move your tablet around.
"Dont forget to subscribe,join my site for new Games and softwares Updates,and to leave comments!"
Saturday, 26 January 2013 0
Subscribe to:
Comments (Atom)