
Monday, 10 June 2013
Cocos2d Conversion Tips for the iPhone 5
Do you like this story?
Looking to convert your cocos2d game to the iPhone 5? Read on!
With the iPhone 5 (featuring Retina 4 and iOS 6 - are you confused yet?) we’re looking at a 640 x1136 resolution. All current apps are still backwards compatible - an 88 pixel wide black letterbox will be added at the top and bottom (or left and right for landscape) of old apps. Coordinates for cocos2d correspond to non-Retina pixels. So a sprite that is set at (1,1) in cocos2d coordinates is actually at (2,2) in terms of iPhone Retina pixels.
In cocos2D, the new game dimensions are 568 x 320 for landscape mode, the most common game orientation (setting a sprite to position 568, 320 will move it to the upper right corner).
Here are some tips on covering cocos2D iPhone games to the new resolution to avoid letter boxing. The examples assume your game is in the landscape orientation (flip the x-y coordinates if your game is in portrait):
0) Get Xcode 4.5.
1) New splash screen image:
Every app will need a Default-568h@2x.png file to avoid letter boxing. Just having this picture deactivates letter boxing - you’ll need to fill the space with your game, though. The file will need to be 640 x 1136 pixels. In Xcode’s issue navigator, Xcode offers to create a default image.
2) Changing in-game background and menu images:
There are several possible strategies:
-Use a larger centered background image for all iPhone models. The image will run off the screen at the left and right sides for older iPhone models.
-Use an if statement to detect the type of device and select one of two background images.
This simple if-statement should work:
CGSize winSize = [CCDirector sharedDirector].winSize;
if (winSize.width == 568) {//code }
//for landscape mode, in cocos2d coordinates
-Use a normal centered background image (960 x 640 pixels for retina). Then use two separate images to fill in the left and right sides if the device is not an iPhone 5.
For scrolling backgrounds, there are two possible solutions:
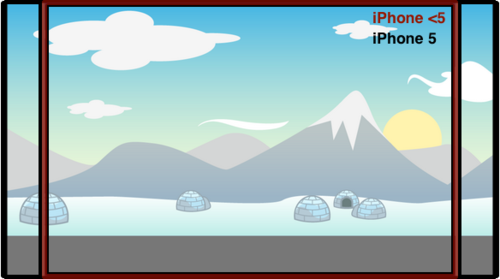
-The easiest (recommended) solution is to have a universal 1136 x 640 pixel background for all Retina devices, which loops when the screen is at multiples of position 1136, no matter which device is running.
-The complicated (not recommended) alternative is to lay out background images side by side. There will be at most three 960 x 640 pixel images on the screen at once. Initially, two images will be visible, side by side, with the second image filling the 176 pixel gap to the left or right of the first image. When only 176 pixels (88 cocos2d coordinates) of the first image are visible, a third image is added to the other end of this chain of images. When the first image falls off the viewing window, it is removed. The process repeats.
3) Altering positions of objects:
One method is to position objects relative to the window size, rather than positioning them with absolute coordinates.
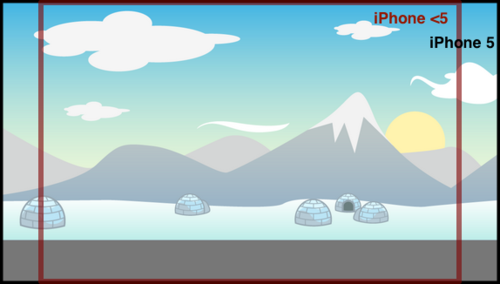
-For UI elements, you can position objects at a slight offset from the screen edge. For example, instead of positioning a pause button at the upper right corner at 440, 280 as you would for iPhone <5, you can position the button 40 coordinates to the left of and 40 coordinates under the upper-right corner.
CGSize winSize = [CCDirector sharedDirector].winSize;
button.position = ccp (winSize.width - 40, winSize.height - 40);
//actual Retina pixels = 80

-For elements in the center of the screen (not UI elements), you can use a scaling factor for whichever coordinate varies between iPhone 4 and iPhone 5 (i.e. the x coordinate for the landscape orientation).
For example, if a sprite is normally positioned at (180, 200) for older versions of the iPhone, then what you first do is find the ratio of the old x-coordinate to the old screen width (in cocos2d coordinates). For example, 180/480 = 0.375. In other words, our sprite’s relative y position is 37.5% of the screen width.

Your new code would then look like this:
CGSize winSize = [CCDirector sharedDirector].winSize;
//only set this variable once in your method/class
sprite.position = ccp (winSize.width * 0.375, 200); //y-coords are unchanged
-If all else fails, you may have to manually set a different layout for the iPhone 5.
4) Wrong variable representation:
Problems will arise where you explicitly set a variable or property as 480 or 320, when what you actually mean is winSize.width or winSize.height. For example, this problem would arise if you want to set a sprite’s position to the corner of the screen, and set its position as (480, 320). That would need to be replaced with (winSize.width, winSize.height).
The reverse is sometimes true, where you use winSize.width/height when you mean 480 or 320 pixels. For example, this problem might crop up in a platformer game where you set the edge of the screen as winSize.width * 2 when you actually mean 960 pixels, which is the actual length of your in-game platform level.
5) Known bugs:
With the iPhone 5 (featuring Retina 4 and iOS 6 - are you confused yet?) we’re looking at a 640 x1136 resolution. All current apps are still backwards compatible - an 88 pixel wide black letterbox will be added at the top and bottom (or left and right for landscape) of old apps. Coordinates for cocos2d correspond to non-Retina pixels. So a sprite that is set at (1,1) in cocos2d coordinates is actually at (2,2) in terms of iPhone Retina pixels.
In cocos2D, the new game dimensions are 568 x 320 for landscape mode, the most common game orientation (setting a sprite to position 568, 320 will move it to the upper right corner).
Here are some tips on covering cocos2D iPhone games to the new resolution to avoid letter boxing. The examples assume your game is in the landscape orientation (flip the x-y coordinates if your game is in portrait):
0) Get Xcode 4.5.
1) New splash screen image:
Every app will need a Default-568h@2x.png file to avoid letter boxing. Just having this picture deactivates letter boxing - you’ll need to fill the space with your game, though. The file will need to be 640 x 1136 pixels. In Xcode’s issue navigator, Xcode offers to create a default image.
2) Changing in-game background and menu images:
There are several possible strategies:
-Use a larger centered background image for all iPhone models. The image will run off the screen at the left and right sides for older iPhone models.
-Use an if statement to detect the type of device and select one of two background images.
This simple if-statement should work:
CGSize winSize = [CCDirector sharedDirector].winSize;
if (winSize.width == 568) {//code }
//for landscape mode, in cocos2d coordinates
-Use a normal centered background image (960 x 640 pixels for retina). Then use two separate images to fill in the left and right sides if the device is not an iPhone 5.
For scrolling backgrounds, there are two possible solutions:
-The easiest (recommended) solution is to have a universal 1136 x 640 pixel background for all Retina devices, which loops when the screen is at multiples of position 1136, no matter which device is running.
-The complicated (not recommended) alternative is to lay out background images side by side. There will be at most three 960 x 640 pixel images on the screen at once. Initially, two images will be visible, side by side, with the second image filling the 176 pixel gap to the left or right of the first image. When only 176 pixels (88 cocos2d coordinates) of the first image are visible, a third image is added to the other end of this chain of images. When the first image falls off the viewing window, it is removed. The process repeats.
3) Altering positions of objects:
One method is to position objects relative to the window size, rather than positioning them with absolute coordinates.
-For UI elements, you can position objects at a slight offset from the screen edge. For example, instead of positioning a pause button at the upper right corner at 440, 280 as you would for iPhone <5, you can position the button 40 coordinates to the left of and 40 coordinates under the upper-right corner.
CGSize winSize = [CCDirector sharedDirector].winSize;
button.position = ccp (winSize.width - 40, winSize.height - 40);
//actual Retina pixels = 80
-For elements in the center of the screen (not UI elements), you can use a scaling factor for whichever coordinate varies between iPhone 4 and iPhone 5 (i.e. the x coordinate for the landscape orientation).
For example, if a sprite is normally positioned at (180, 200) for older versions of the iPhone, then what you first do is find the ratio of the old x-coordinate to the old screen width (in cocos2d coordinates). For example, 180/480 = 0.375. In other words, our sprite’s relative y position is 37.5% of the screen width.
Your new code would then look like this:
CGSize winSize = [CCDirector sharedDirector].winSize;
//only set this variable once in your method/class
sprite.position = ccp (winSize.width * 0.375, 200); //y-coords are unchanged
-If all else fails, you may have to manually set a different layout for the iPhone 5.
4) Wrong variable representation:
Problems will arise where you explicitly set a variable or property as 480 or 320, when what you actually mean is winSize.width or winSize.height. For example, this problem would arise if you want to set a sprite’s position to the corner of the screen, and set its position as (480, 320). That would need to be replaced with (winSize.width, winSize.height).
The reverse is sometimes true, where you use winSize.width/height when you mean 480 or 320 pixels. For example, this problem might crop up in a platformer game where you set the edge of the screen as winSize.width * 2 when you actually mean 960 pixels, which is the actual length of your in-game platform level.
5) Known bugs:
- Landscape mode is broken with iOS 6. The beta version of cocos2d, version 1.1, fixes the issue.
- One workaround for cocos2D 1.0.1 is replacing [window addSubview:viewController.view] with window.rootViewController = viewController in the application delegate.
- For cocos2D 2.0, the latest beta version, 2.1, fixes the issue and also contains iPhone 5 templates.
- For Kobold2D, the issue is fixed in the latest version.
"Dont forget to subscribe,join my site for new Games and softwares Updates,and to leave comments!"


This post was written by: Author Name
Author description goes here. Author description goes here. Follow him on Twitter
Subscribe to:
Post Comments (Atom)


0 Responses to “Cocos2d Conversion Tips for the iPhone 5”
Post a Comment